Dog nail trims don’t have to be scary
Dog nail trims are one of the most frequently requested procedures veterinarians are asked to do. Why? Many dog owners are apprehensive about dog nail trims. Typically, their concerns fall into these three categories:
- They’re afraid of hitting the quick (the blood and nerve supply) and causing pain to the dog.
- A previous negative nail trimming experience has caused the dog owner (or dog) to dread dog nail care.
- They don’t know where to start. They don’t feel equipped with the right tools and know-how to tackle the trim.
However, I believe that every dog owner can successfully master the dog nail trim! You can do it! We can help!
Why dog nail trims are an important part of your dog’s health
Nails that are allowed to grow too long alter the way a dog stands and walks. Long nails hit the ground when a dog walks, making it uncomfortable and even painful for him or her. Dogs learn to compensate by favoring the tender parts of their paws or by changing how much pressure they put on the sensitive parts of their feet. This shifts their normal posture and leaves them prone to developing back problems.
Additionally, dogs with untrimmed nails run the risk of injuries around the house because their nails can easily get caught in the carpet and rip open. Nails that have been neglected can grow long enough to get tangled in the fur on a dog’s paws, making it impossible to walk.
5 tips for successful dog nail trims
Skipping a nail trim is easy to do because dogs don’t naturally welcome the idea of having their feet handled. That’s why it is important to set yourself up for nail trimming success with these tips.
Tip #1: Exercise your dog before you get started!
Here’s a quote from a story that I wrote for The Grey Muzzle Organization:
If your dog is not particularly cooperative about having his or her nails trimmed, remember the old adage, “A tired dog is a good dog.”Click To TweetBefore you grab the dog nail clippers, grab a leash and take your four-legged pal for a spin. Draining excess energy will take the edge off and help the nail trim go smoothly.
Tip #2: Be prepared! Gather your supplies before you begin!
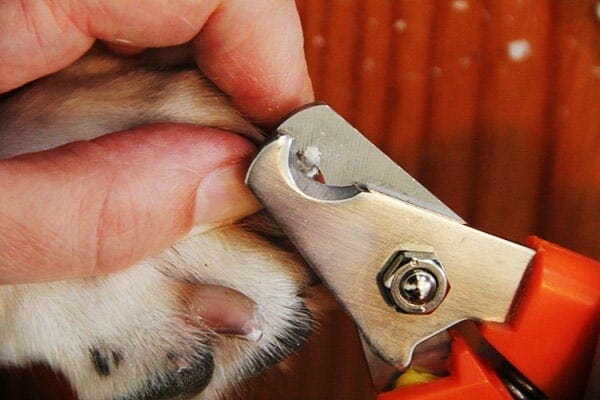
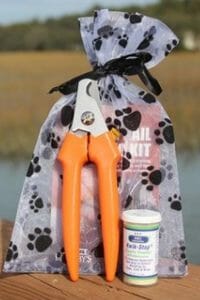
Tackling the dog nail trim means having the right tool for the job. I recommend using Miller’s Forge nail clippers. I never recommend the guillotine style trimmers. You’ll have more control and precision for the job with the nail clippers that resemble small pruning shears. I’ve used this style of clipper throughout my 20 years as an integrative veterinarian. (I even keep a pair handy in my purse.) Also, I recommend having a bottle of styptic powder on hand. Even the most experienced dog owner can occasionally clip into the quick–the blood and nerve supply in the toenail.
Would you like to use the clippers and styptic powder that I recommend? You can buy my nail trimming kit here.

Tip #3: Find the perfect position.
Decide ahead of time how you will hold your dog. Choose a position that is visibly comfortable for him or her. You may want to consider an environment that offers your dog happy distractions such as the porch or an outdoor patio area.
Tip #4: Make conservative cuts.
Cast the traditional concept of making one large cut to each nail aside. Instead, make conservative or small angled cuts.
Tip #5: Keep it positive!
Give an abundance of verbal praise. Distract and reward your dog with high-value treats.
Tip #6: Enlist the help of a friend.
Some dogs may be fearful of the dog nail trim no matter how well you’ve prepared. If that’s the case, enlist the help of a friend or family member who can support you and who can encourage your dog with lots of praise, head rubs, and treats.
Tip #7: Celebrate! You and your dog make a great team!
It’s important to end the nail trim on a positive note. Even if you don’t finish trimming all the nails on all four paws, it’s more important that you keep the experience positive for your dog. Celebrate your success together!
Finally, by following these five tips, you’re starting off on the “right paw” by turning a dreaded task into a positive bonding experience for you and your dog.
Would you like more tips on dog nail care?
For a real-life example of the impact of learning this skill, please read 10 Tips to Whole Pet Health Care and watch the nail trimming video of a blind dog named Remedy. Or, check out How to Clip Dog Nails: Turning a Scary Task Into a Success.
Have you tried any of these tips?
We’d love to hear! Please comment below.


They say they can last 2 to 3 months.
So can you remove the toe grips to cut his nails then reapply them?
Hi Joan,
That is a great question. Yes, as long as the ToeGrips are not glued on (which is an alternate method of application and not the “norm”), then you can simply remove them, trim the nails, and reapply the same ones until they show too much wear and need to be replaced. Hope this helps! Please feel free to follow up with us if you have any other questions.
This just goes to show “you never stop learning!” I always preferred millers forge guillotine type nail clippers for my dogs for the past 40 years, and never had a problem. I have always cut on the vertical. But being an avid collector of all things dog, i did also have a pair of regular Miller Forge heavy nail clippers hanging around. My current dog, Peyton, an 8yo Chesapeake Bay Retriever, got “quicked” once during a nail trim as a pup and has never trusted me since with trimming his nails…from age 6 months till last March he swam/ran on our concrete pool deck 5-6 hours a week and had perfect, short nails and never needed a trim all those years! Since last March when he injured his back, he could no longer run around and jump into the pool and trim his own nails. It was always a game of foot tug-o-war with him yanking his foot away just as he felt the slightest pressure of the nail clipper blade on his nail (even if just nipping the very itty tip!) And me having to take multiple nips on each nail…each time him pulling away just as I got it lined up right. He also has thick, black nails. I watchdd Dr.Buzby’s video on trimming dark nails…I immediatly ran to the “doggie extras” box and dug out the regular nail clippers and grabbed a heaping handful of treats and laid Peyton out on the bed…nose pointed at treat pile and began to use Dr. Buzby’s method. I started on the outside of each nail, then the inside and then the center….shaving small pieces off instead of CLIPPING them, which kept him relaxed and not so concerned as he didn’t feel that direct downward pressure on his nail! (That and shoveling one treat per nail into him helped!) Only one nail did he yelp on, and that was just him being a wussy! He still pulled his back feet away, but relaxed as he realized the pressure on the nail wasnt there. This trim process also relaxed him enough to let me measure him for his ToeGrips without yanking his feet away everytime i touched his nails! This also saved me $15 as I was about to take him in to be dremeled this week! I’ll do this new trimming procedure every 2 weeks till his nails are back to short, then monthly for maintenance. Thanks Dr. Buzby! Now lets hope the ToeGrips help my service dog too!