Ever wondered how to clean a dog’s ears? In some cases, improper cleaning techniques can cause pain and damage to your dog’s ears. To keep this from happening, integrative veterinarian, Dr. Julie Buzby, gives you some ear cleaning “dos” and “don’ts” and detailed step-by-step instructions that will turn you into an ear-cleaning pro in no time.

Last month, I had a client bring one of my favorite patients in for a visit. His name is Charlie, and he is an 8-year-old Cocker Spaniel. In keeping with his breed, Charlie had long, curly hair everywhere—including his ears. The week before Charlie came to visit me, he had been camping with his family. Like any good camper, Charlie enjoyed swimming in the lake to stay cool.
However, when Charlie and his family came back home, poor Charlie could not stop scratching at his ears. When his mom brought him in for his appointment, she said that his incessant scratching was even waking her up at night.
As I looked in Charlie’s ears, I could see that they were very red and irritated. Poor Charlie had an ear infection from all the swimming. Thankfully, there were medications I could prescribe to help him get some relief. Plus, his mom could help him by cleaning his ears at home.
As I demonstrated ear cleaning to Charlie’s mom, I sympathized with her and told her that my own dogs have had ear infections too. Unfortunately, ear infections can be common and uncomfortable for our furry friends. But thankfully, ear cleaning is something dog parents can do to help prevent ear infections and other causes of ear discomfort.
Why do dog’s ears get dirty?
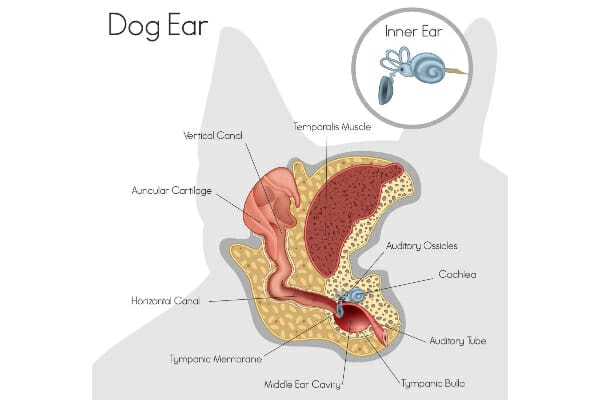
In order to properly clean our dogs’ ears, we should understand how their ears are designed. Dog ears are fairly similar to human ears, but there are some differences. For example, a dog’s ear canal is longer than ours. Also, it has somewhat of an “L-shape” to it. This means dogs may get debris, wax, water, and plants trapped in their ears. And even if dogs shake their heads or scratch their ears, they probably can’t get all this material out by themselves.
Some dogs are more prone to dirty ears than others. Certain breeds such as Cocker Spaniels or Shih Tzus can be predisposed to getting build-up in their ears. Dogs with floppy ears instead of ears that stand up can also have more ear problems. This is because floppy ears tend to trap wax and debris and reduce airflow to the ear canals. And as Charlie’s mom noticed, hair in a dog’s ear canal can act as a barrier to hold dirt and moisture in.
Dogs with seasonal or food allergies also are more likely to get ear infections. This is because allergy-associated itching can weaken the skin barrier and set up inflammation and infection in the ears (and other places on the body). As a side note, if your dog suffers from allergies, be sure to check out my blog, Allergy Medicine for Dogs.
Finally, sometimes our senior dogs are prone to gunky ears. This happens because their skin can thicken and be more susceptible to infections. Some diseases that we see more often in older pups like Cushing’s disease in dogs and hypothyroidism in dogs also can predispose them to dirty ears and infections.
What are some ear cleaning “dos” and “don’ts”?
Before we get into the process of how to clean your dog’s ears, there are a few things to keep in mind. Pay close attention to this list of “dos” and “dont’s”:
Do:
- Use an ear cleaner that is designed for dogs.
- Reward your dog regularly during and after cleaning. Some dogs may take time to get used to having their ears cleaned. We want your dog to have a positive experience—sort of like a relaxing day at the spa.
- Be gentle when cleaning the ears. Sometimes dirty or infected ears can be quite painful. Also, the eardrum may be fragile.
- Ask your vet how often you should clean your dog’s ears. The answer can vary from dog to dog depending on the dog’s lifestyle, ear conformation, breed, and past history of ear problems.
Don’t:
- Don’t use an ear cleaner that is alcohol or hydrogen peroxide-based (or use straight alcohol or peroxide). These liquids can be harsh on the ears and cause more pain and irritation.
- Don’t use Q-tips (i.e. cotton-tipped applicators) when cleaning your dog’s ears. Q-tips can damage the ear drum if inserted too far in the ear. Plus, Q-tips may actually push debris further into the ear, which is counterproductive. Your vet or veterinary nurse may use Q-tips in some situations, but this is because they know how to do it safely.
- Don’t use water to clean your dog’s ears. This can actually cause more debris to get trapped and doesn’t break down wax like a good ear cleaning product does.
- Don’t pluck your dog’s ear hair. Sometimes plucking may cause more damage to the ear and can be painful as well. Occasionally there may be situations where the vet will need to remove some hair in the ear canal. But this is best left to his or her professional judgment.
If you are ever unsure about what you should or shouldn’t do when cleaning your dog’s ears, please consult with your veterinarian for advice. He or she can tell you what would be best for your dog’s situation.
Clean your dog’s ears in 10 easy steps
Now that you have an idea of why dogs get dirty ears and some of the ear cleaning “dos” and “don’ts,” it is time to jump into how to clean those ears. I have broken the process down into 10 simple steps that should help make ear cleaning fun and easy for everyone.
Step 1: Prepare your supplies
You will need an ear cleaning solution for dogs. It may be one you purchased over the counter or from your veterinarian. Also, grab something to wipe debris out of your dog’s ears. Pieces of a clean old T-shirt, makeup remover pads (without any product on them), gauze, or cotton balls are all good non-abrasive options. If your veterinarian prescribed medication for your dog’s ears, you will want to get that out as well.
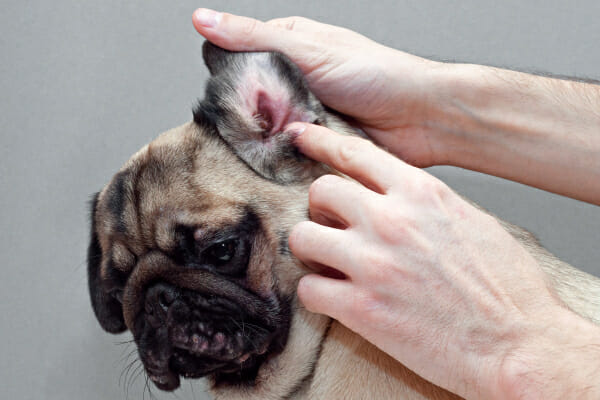
Step 2: Hold the ear flap
Gently grasp the tip of the ear flap and pull upward. This will expose the inside of the ear and the ear canal.
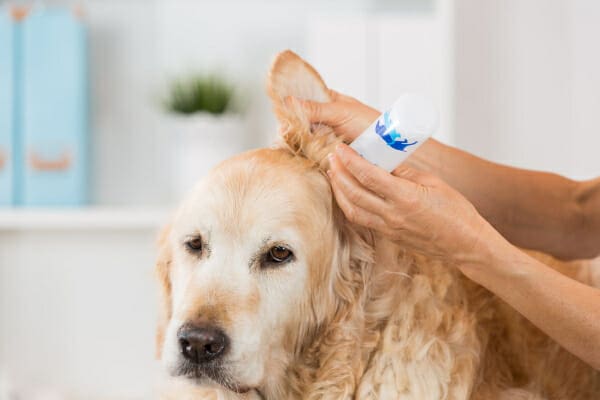
Step 3: Apply the cleaner to the ear
This can be done in two different ways. One option is to apply the ear wash directly into the ear canal. For this method, gently insert the tip of the bottle into the ear canal and squeeze the bottle. Be sure not to touch the tip of the bottle to the ear or push it in so far that you damage the ear drum.
The second method works well for the dogs who don’t like the feeling of ear wash going into their ears. Instead of pouring the cleaner into the ear canal, apply a generous amount of the ear wash to a cotton ball. Then insert the cotton ball into the ear directly. Ensure the cotton ball is large enough that when you let go of it, it won’t slide far enough down into your dog’s ear canal that you can’t reach it.
Step 4: Massage the base of the ear
Whether applying the wash to the ear directly or placing an ear cleaner-soaked cotton ball in the canal, you now need to massage the base of the ear. Do this gently as to not hurt your dog, but firmly enough that you can hear the ear wash swishing around in the canal.
Step 5: Allow your dog to shake his or her head
Your dog may want to shake his or her head due to the feeling of the ear wash in the ear canal. Not only is it ok, but it is actually a really good thing. Shaking his or her head will help get the wash farther into the canal to break up more debris. It may also bring debris to the surface.
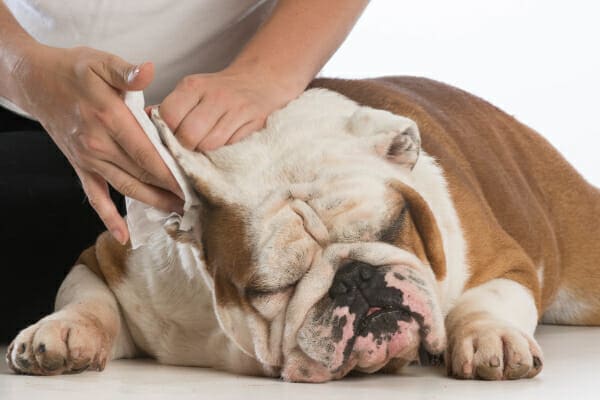
Step 6: Wipe out the ear
Once the ear wash is thoroughly massaged through the canal, it’s time to wipe out the broken-down debris and wax. If there is a cotton ball remaining in the ear, remove it now. Wipe the ear canal gently by using your finger and gauze (or whatever you are using instead). Insert your finger and gauze into the ear canal and gently wipe the ear canal in a circular motion. Then, pull your finger and the gauze out of the ear to remove the debris.
Step 7: Repeat as needed
There is a good chance that you may need to repeat steps 3-6 several times to get the ear fully clean. Continue the process until you no longer get debris with each wipe.
Step 8: Wipe the ear flap
The inner surface of the dog’s ear flap can get dirty, too. Once the canal is clean, moisten a cotton ball (or other type of wipe) with ear wash and used it to clean the inner ear flap.
Step 9: Double check your work
Always verify that you did not leave any gauze or cotton balls in your dog’s ears. This could be very uncomfortable for him or her and make an ear infection more likely to occur.
Step 10: Apply medications (if needed)
If your veterinarian prescribed medication for your dog, apply it according to the direction on the label.
The entire time you are cleaning your dog’s ears, remember to do your best to make it a positive experience. Use treats and praise as a reward. Give your dog a short break if he or she is getting stressed out by the process. Also, if you have any questions or concerns about ear cleaning, please ask one of the members of your dog’s veterinary team to demonstrate ear cleaning or help you troubleshoot.
When should you take your dog to the vet for ear problems?
Ear cleaning is something that you can do at home to help keep your dog healthy and comfortable. However, it isn’t the solution for all problems. Contact your veterinarian if you notice:
- A strange smell to the ears.
- Larger than normal amounts of ear debris, especially if is black, red, or other colors not typical for your dog.
- Red, irritated ear canals.
- Excessive scratching at the ears, head shaking, or rubbing head on the floor.
- A head tilt.
- Crying or whining when you handle the ear.

These can all be indicators of an ear infection or a foreign object like a plant seed trapped in the ear. (To learn more about ear infections, check out my podcast Ear Infections in Dogs.) Especially in senior dogs, some of these signs may also indicate other problems such as old dog vestibular disease. For this reason, it is always best to consult your vet when you notice these signs rather than simply continuing to clean the ears in hopes it will help. The sooner a possible infection or other problem is caught, the easier it is to help your dog get better!
Happy cleaning!
Hopefully you now have a better idea about how to clean your dog’s ears and are ready to confidently tackle the task. It might seem a bit overwhelming at first, but chances are, you and your dog will soon become accustomed to the routine. Ideally, in time it will be second nature to you and relaxing for your dog.
If this isn’t the case, please reach out to your veterinary team. Not all dogs will enjoy ear cleaning initially, especially if they don’t like having their ears handled. However, there are techniques the veterinary team can show you that can help your dog grow to like—or at least tolerate—ear cleaning. Also, anytime your dog’s ears seem to be worse or not improving with ear cleaning or you have any other concerns, promptly contact your vet.
What are some of your favorite dog ear cleaning hacks?
Please comment below

Is there an OTC ear wash product you recommend for ears that are dirty but don’t need veterinary care?
Hi PibbleMom,
This is a great question! It is also one that you would probably get a different answer from each different vet you asked. We all have our favorites based on experience and patient outcomes. I typically use Vetoquinol Ear Cleaning Solution for normal/routine cleaning and then recommend Epi-Otic Advanced for dogs with a history of ear infections. I am not sure if either of these are available over the counter but am sure your vet has a product they like on hand that can be purchased if needed. Take care!
I was going to use EpiOtic SIS but then noticed it contains salicylic acid. My dog’s ears are very sensitive – she can’t even stand the friction from gauze, so I’m worried this product might be too irritating. she doesn’t have excessive discharge and only a mild yeasty smell & scratching / head shaking. Would it be ok to use saline for irrigation instead? I note your article says not to use water – is this the same as saline for irrigation? Thank you!
Hi Mary,
I understand your concern for your pup. If you are worried the EipOtic will be too irritating, then I highly recommend you talk to your vet about alternative cleansers or a flush. I would not use saline. It will give a similar effect as using water. Since there is nothing in the saline to kill yeast or help with drying, it will leave the ear moist and aid in the growth of bacteria and yeast. Wishing you all the best of luck and take care!
Hello, Maria here in Australia. i have a 4 yo Shar Pei – Pax. He had red waxy material in his ears even from the first day I.brought him home as a 10 week pup. Head shaking, ‘Parmesan Cheese Ears’ – my quote as I am a poet. Lots of intervention, tests on tbe muck stuff, rods and all tjat stuff so we have a nuce stew of fungal plus bacteria. Stenotic ear cannals and he does suffer skin problemd. MY TIP FOR CLEANING HIS EARS.- try eyebrow spoolies or the clean left over mascara brushes. They must be soft. I twist the brush gently into the esr and twist it coming it. No pushing – all twisting action. You must pull ear flap up first. This tends to collect debris rather than push it in like cotyon buds do. Also using McLouds Herbal Otitis treatment – topical and oral. Has lots of Thuja in it plus Apple Cider Vinegar. Vet suggested Cortokenazole Oral – I can’t bring myself to do it due to.side effects. I have used Carprieve when it is bad. Resigned to always having to manage it. Spoolies are great cleaners – soak in dishwasing luquid and vinegar for thorough clean after using.
Hi Maria,
I am sorry Pax is living with these chronic ear and skin issues. I appreciate you taking the time to share your experience with us and offering up these great suggestions. One word of caution to other readers…. the reason I don’t recommend using cotton buds/Q-tips is that there is risk of rupturing the ear drum if inserted in too far (this is mentioned in the “Don’t” section of the article). I am afraid that using eyebrow spoolies or mascara brushes will carry the same risk. While I am positive they can be used with success, I just think the risk outweighs the benefits for most owners. Wishing you and your sweet boy all the best. Keep up the great work!
Thank you for tips & advise given. i have 3 poodles at home. I use cotton bud instead of cotton ball. Is it good to use them ? what is the advantage of using cotton ball over cotton bud?
Hi Bhaskara,
This is a great question. I try to avoid having clients use cotton buds (I hadn’t heard that term before! We refer to them in the article as Q-tips.) due to the risk of sticking one too far into the ear canal and coming into contact with the ear drum. Also, since cotton balls are wider, they are able to wipe away more debris with each pass if you are using them instead of gauze as mentioned in step #6. Hoping that helps clear things up a bit. Best of luck to you and yours!
My dog doesn’t like to have her Nails trimmed,is there anything I can use for her Nails and how much is this going to cost?
Hi Linda,
I am not sure what information you are looking for. Are you asking about types of nail trimmers? Or something to help take your dog’s anxiety away? Here are links to other articles with great information about trimming your dog’s nails:
1. Best Dog Nail Clippers for “DIY” Dog Owners
2. How to Clip a Dog’s Toenails: Dear Mishu, a Rescue Dog and Advice Columnist, Answers Your Questions
3. Dog Toenail Anatomy 101
Don’t forget you can always discuss this with your vet if you need additional advice or resources!
I just received the toe grips for my golden retriever. How long do I need to soak the. In alcohol before applying? Thanks so much. My vet is going to apply them for me.
Hi Barbara,
I am so excited you are trying ToeGrips for your Golden! They only need to be in the alcohol for one second. It’s more like a dip than a soak. The alcohol helps to lubricate the grips to help them slide into place and then evaporates so the grips don’t slip back off. I hope this helps! Feel free to leave me some feedback and let me know what you think. I hope ToeGrips will be a game changer for your pup.
I will order Toe Grips when I measure my giant schnauzer’s toe nails. Toe Grips appear to be a very worth while items
Hi Beverly,
I’m excited that you decided to try some ToeGrips for your Giant Schnauzer. You can find information about measuring your dog’s toenails and some helpful videos in our ToeGrips instructions If you have any questions or concerns with the ToeGrips, please don’t hesitate to reach out to the customer support team. They are great at troubleshooting and committed to helping you and your dog have success with the ToeGrips. Please let us know how the ToeGrips work out for your dog!