Knowing how to wrap a dog’s paw is an important skill for dog parents. Integrative veterinarian Dr. Julie Buzby lists the necessary supplies, gives detailed instructions about how to wrap a paw, and includes some bandaging tips.
Being a dog parent is extremely rewarding. However, it can be scary at times too. Especially when our beloved dogs injure themselves and we aren’t sure what to do.
However, knowing some basic dog first aid can help you remain calm if your sweet pup gets injured. One skill that is useful to know is how to properly bandage your dog’s paw.
My friend Shannon found this skill useful when her 8-year-old Jack Russell Terrier named Jackson injured his paw pads. While on a nighttime walk, the normally happy Terrier yelped. Shannon immediately picked up her pup.
Poor Jackson had cut his paw pads on a metal object that had blown onto the dark sidewalk, and his paw pads were bleeding.
Unfortunately, since it was so late at night, my clinic, along with other veterinary clinics, were already closed for the day. Thankfully, Shannon was prepared. She had supplies at home to make a bandage for Jackson and knew exactly what to do for him until she could get him to the vet in the morning.
Should a similar situation ever happen to you, I want you to be prepared. So let’s dive into why you might need to bandage a paw, what supplies you need, and how to wrap a dog‘s paw. I know bandaging can sometimes be tricky, so pay attention to some of my bandaging care and troubleshooting tips at the end too.
Why might a dog need a paw wrapped?
Dogs use their paws for all kinds of activities, including running, jumping, digging, and playing. Thankfully, their paws are durable and designed for these tasks. However, since they don’t wear shoes as we do, dogs can injure their paws and nails.
While there are many different situations that may require you to wrap you dog’s paw, some of the most common include:
- Toenail ripped off
- Burnt or scraped paw or paw pad
- A puncture wound on the paw
- Bite from another animal
- As part of first-aid for bee stings or insect bites
- Paw pad injury with a flap
- Paw infections or nail infections
- To prevent your dog from licking the paw
- To protect a healing surgery site
What supplies do you need to wrap a dog’s paw?
If one of these problems is affecting your dog, it is likely that you will need to wrap his or her paw in a bandage until you can take your dog to a veterinarian. The first step to placing a bandage on your dog is to be sure that you have all the necessary supplies.
The bandage supplies you need may vary a bit depending on your dog’s injury. However, I recommend keeping these basic supplies in your dog first-aid kit :
- Square gauze pads, non-stick (telfa) pads, or bandage padding
- Rolled gauze bandage
- Adhesive bandage roll (such as vet wrap, coban, or athletic wrap)
- Adhesive tape for bandages
- Clean cloth
- Warm water with gentle soap, chlorohexidine, or betadine
- Antibiotic ointment
How to wrap a dog’s paw
Before wrapping your dog’s paw, you should always assess your dog and the injury. If your dog’s injury is severe (i.e. deep cuts, profuse bleeding, potential for broken bones, large areas of skin lost, etc.), please contact the closest veterinarian immediately for an emergency vet visit.
Also, if your dog is very painful, it would be best to have someone help you with the bandage. Even the sweetest and most well-trained dogs can be reactive when they are in pain.
If you decide it is safe for you to bandage your dog’s paw, you can now follow these steps:
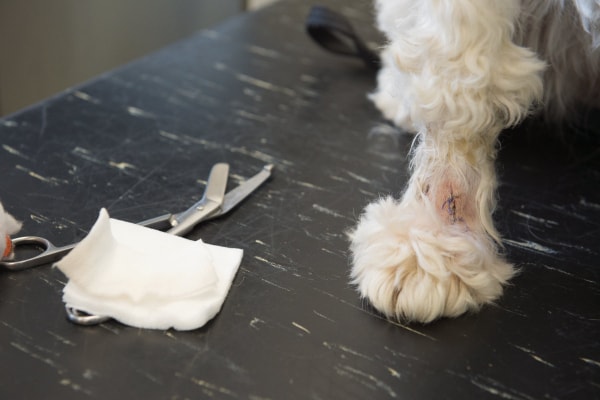
1. Clean the wound
Use a clean cloth to gently clean the affected area. Often moistening a washcloth with warm water will work well. However, if you think there are debris and bacteria in your dog’s wound, you may also want to use mild soap, chlorohexidine scrub, dilute chlorohexidine solution, betadine (i.e. povidone iodine) scrub, or dilute betadine solution to disinfect the wound.
2. Dry the area
After cleaning the injured area, ensure that it is dry before you start placing the bandage. It is important not to trap moisture in the bandage, because this could cause further infection and irritation.
3. Place the gauze square on the wound
If your dog has an open wound such as a cut or scrape, place a square gauze pad over the wound. This will give the wound extra padding and protection.
A non-stick pad is particularly helpful for open wounds because it keeps the gauze from getting stuck to the wound. You can apply a layer of antibiotic ointment on the gauze pad, which will also help keep it from sticking and provide some antimicrobial action.
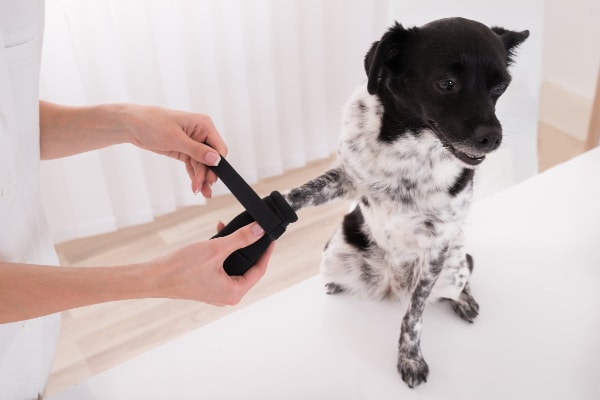
4. Wrap with rolled gauze
Take the rolled gauze and gently start wrapping it around your dog’s paw and up the leg, overlapping each layer by about 50%. This is the first layer. Repeat the process again, starting at the paw and moving up the leg.
Having two layers of bandaging helps keep the gauze in place and provides more protection.
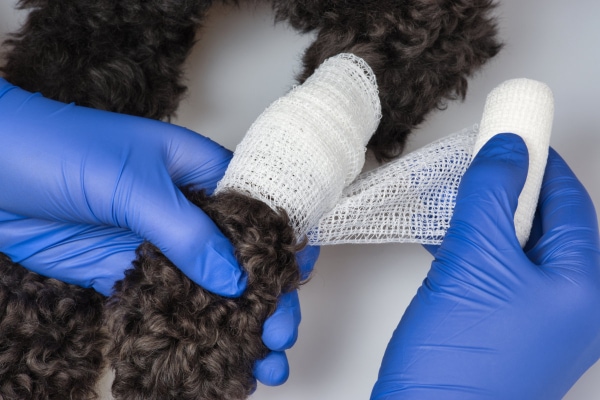
If your dog’s middle two toes are not injured, I recommend letting them stick out of the bandage. This will allow you watch the toes for swelling or coolness, two signs that the bandage is too tight.
5. Wrap with adhesive bandage material
Next, take whatever adhesive bandage material you are going to use. Wrap the bandage around your dog’s paw the same way as the rolled gauze. Start at the top, go all the way down the paw (leaving the toes exposed if possible), and then coming back up.
It is easy to pull vet wrap, coban, and similar stretchy products a bit too tight when wrapping them. You want to wrap with a mild stretch but should not be stretching the wrap significantly.
Bandaging the paw too tightly can cut off circulation, which is dangerous, so it is extremely important you do not pull the adhesive bandage material too tight.
6. Use tape to secure the end of the bandage
Many types of adhesive bandage material will stick to themselves. But if needed, you can place a small strip of bandage tape on the end of the adhesive bandage material to secure it in place.
Remember that your bandage may vary slightly depending on your dog’s injury and the location of the injury. However, these basic steps will apply to most bandages on the paw.
Bandaging tips and troubleshooting
Now that you have your dog’s paw bandaged, there a few things that you should keep in mind:
Keep the bandage clean and dry
This is important to prevent infection. If it is wet or muddy outside, place a plastic bag over the bandage when your dog goes outside. Alternatively, you can place a PawZ dog boot over the bandage when going outside for potty breaks. Ensure that you remove the bag or boot as soon as you come inside.
Ensure the bandage is not too tight
If possible, keep your dog’s toes exposed. This will allow you to check for swelling that would indicate that the circulation of your dog’s paw is being cut off. Normally the two middle toenails of a dog’s foot are close together. If you notice them spreading apart, this is a sign of swelling. You should also check the exposed toes for discoloration or coolness, both of which can also indicate the bandage is too tight.
Ensure that you can fit one to two fingers into the top of the bandage. This is a good way to check that the bandage is tight enough to stay up but not so tight that it will cut off circulation. Especially if your dog’s toes need to be covered by the bandage, this is a great way to assess bandage tightness.
Accidentally making the bandage too tight is the most dangerous bandaging mistake you can make. In some cases, dogs have even lost toes or a limb to a too-tight bandage. So I cannot emphasize enough the importance of carefully monitoring your dog’s foot to ensure the bandage is not too tight.
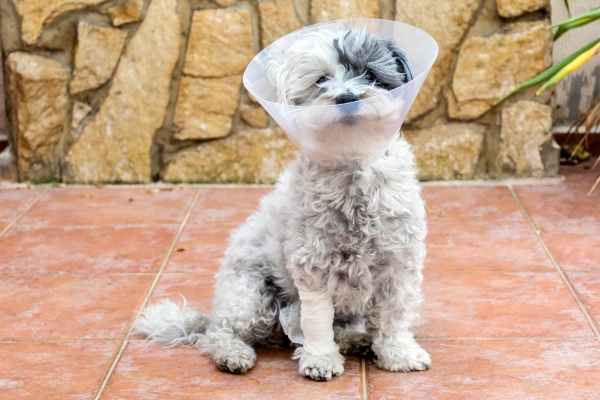
Keep your dog from chewing the bandage
Don’t allow your dog to lick or chew on the bandage. You don’t want your dog to accidentally ingest the bandage materials and develop an obstruction in the GI system. Additionally, licking can cause further infection and irritation.
If you catch your dog trying to chew on the bandage, an Elizabethan collar (i.e. E collar or “cone”) might help deter him or her. If you do not want to use a cone for your dog, sometimes using a bandage deterrent product (i.e. something that makes the bandage taste bad) can help instead. You can often purchase one through your veterinarian or local pet store. The most common flavor is bitter apple.
Change the bandage regularly
Unless your veterinarian instructs you otherwise, change the bandage every one to two days. You should also change the bandage if it becomes wet or dirty.
Keep an eye on healing
Every time you change the bandage, be sure to inspect your dog’s wound. Sometimes it is helpful to take pictures of the wound so you can monitor the healing process. Your vet may also find the pictures helpful. If it seems like the wound isn’t healing as expected, if it develops a yellow or white discharge, or if your dog suddenly seems more bothered by it, consult your veterinarian.
When should I take my dog to the vet?
A properly placed bandage can be very helpful when trying to care for your dog at home. A bandage is a great way to protect a minor cut or injury that may not require a trip to the vet. Bandages also can be useful for more severe injuries. However, it is important to work closely with your veterinarian when you need to wrap a dog’s paw, especially for more significant injuries.
When the injury first happens or anytime in the bandaging process, promptly contact your veterinarian if you notice:
- Persistent or large amounts of bleeding
- Yellow, green, or white discharge from the wound that resembles pus
- Redness or swelling around the wound
- A potentially broken bone
- Swelling of the toes from a tightly wrapped bandage
- Signs your dog is in pain such as limping, crying out, or growling when touched
- The wound is not healing or is worsening
These are the most common reasons that you may need to seek help from a veterinarian. However, anytime you have questions or concerns about your dog, even if they aren’t on this list, remember that your veterinarian is your best resource.
Get your first-aid kit ready
The next time you are at the store (or shopping online), I suggest you pick up the supplies that you would need to wrap a dog’s paw. Then put them somewhere that you can find them—ideally with the rest of your dog care supplies. That way, should the need arise, you will be prepared to jump into action.
Remember to stay calm, enlist the help of a friend or family member if needed, and follow the steps and precautions I have outlined. You can do it!
Do you have any tips or trick for wrapping a dog’s paw?
Please comment below.
My English bull dog pulled one of his nausea out. Not sure how. It was long but vet said they couldn’t trim it. I’ve tried everything a cone a bandage wrapped around it. He gets heated up and I have to remove it and give him ice. Try to keep I clean and medicated but he licks and chews at it. I don’t know what to do and am scared
Hi Kathy,
I understand your concern for your pup. Unfortunately, without being able to examine him myself it is hard to offer specific recommendations. It sounds like the situation is getting worse and needs medical attention. Did your vet look at the injured foot or was this a conversation over the phone? They definitely need to know that the injury is not healing. If you are not getting the level of care you need, it is ok to seek a second opinion. Praying for healing and a positive outcome for your sweet boy.
Hi, my dog went in a pond and came out limping, i checked his foot and noticed blood. When i got him home he has a cut with a flap of skin. the wound looks nice and pink and i bandaged it up. I put an iodine patch on the wound after i had washed it in salt water. then put a pad over that for a bit of comfort and bandaged it. I did take him to the vets, they said they could cut the flap off, but they decided to leave it saying it would die off. The flap looks healthy in the middle but dried out on the edges. They told me not to bandage it. I am not happy with not bandaging it, dirt will get in every time he walks anywhere. He doesnt like it touched and will growl. Any suggestions please.
Hi Andrea,
I am sorry your pup has sustained this injury to his paw pad. While some flaps can be left unbandaged, I too would be worried if dirt is getting inside the wound. If your dog is painful and the flap is bothering him then it may be best to have it trimmed back under sedation or removed completely. Without being able to examine it myself, it is hard to offer specific recommendations. I encourage you to contact your vet and be straight forward about your concerns and wishes. Hoping this issue will resolve quickly and that your boy can get back to living his best life.
My dog recently hurt her lower leg (above the dewclaw) she sustained a laceration that bled profusely. I took her to the vet where they sedated her and glued the wound shut. The bandage they made worked its way down off the wound so I had to rebandage it myself. I guess I made it too tight because I caused her paw to swell. Her follow-up appointment is Monday morning. Is it okay to wait until then for it to be checked out? I loosened the bandage but the swelling has not gone down much.
Hi Meg,
I am sorry you are having trouble with the bandage and understand how frustrating this can be. If the foot is swollen, then I would not wait till Monday. It could be the bandage is still too tight or sometimes when tissue is damaged (like with the original laceration) it can disrupt the normal lymph flow from the tissues to the lymph nodes causing a buildup of fluid. Either way, if the swelling is not addressed promptly, it can lead to other more serious consequences. I would completely remove the bandage and then see if you can at least call a nearby clinic or emergency vet for further instructions and guidance. You will have to closely monitor your pup while the bandage is off to ensure she does not lick at the wound. Try not to stress and know that we are all here for support. You can do this! Best wishes to you and your sweet girl.
Thank you for having this opportunity to talk to a real vet!
I have a chihuahua, she’s in good health generally. She’s going to be 14 soon.
I took her to a local doggie beauty parlor and she came back itching then a few days later she was fussing with a toenail on her hind leg. This nail is normally really long and I watch for it to start curling. I think the lady might have split the nail when she cut it I don’t know for sure as my little dog won’t let me near it. But she’s licking it to the point of bleeding. I’ve been reading about the toes and and how to dress them and the socks and the whole thing. Wonderful, concise info! Thank youI! I’m just wondering if I need to get into a vet sooner than later? I have an appointment with the vet and it’s not for another week or so. The vet clinic, perhaps, is trying to let me take care of it. (Or let her take care of it. I appreciate the help you’ve given me already. Lots of ideas already but this dog, as much as she loves me, is older and she’ll bite it at me if I touch that leg. I do have a over the mouth “thingie”.
Thank you, thank you very much for your kindness and expertise!
Hi Judy,
I am sorry your senior girl is having issues with her toenail. I understand your concern and agree this needs to be addressed sooner rather than later. If your pup is painful and the nail is bleeding, you may have to take her to an urgent care clinic or see if your regular vet can fit you into the schedule earlier than planned. I hope you can get her the medical attention she needs in a timely manner. Praying for healing and a full recovery for your sweet girl.
noticed my dog Ozzy would not put weight on his back paw. when he tried to he would fall to one side so I felt his legs thinking he maybe jumped off my bed and damaged it but I did not feel anything different from the other. should I wrap his paw just enough to let it heal and not use it in the process?
Hi Claire,
I understand your concern for Ozzy and think it is great you are reaching out for advice. Without examining him myself, it is hard to offer specific advice. In general, if there is no obvious wound, I would not recommend bandaging the paw. This could be caused by many different things and definitely needs to be evaluated by your vet right away. Hoping all is well and your sweet boy is living his best life. Feel free to leave an update if you have a chance.
My 15 yr old Pekinese is allergic to almost everything. He has many skin yeast infections and his paw pads stay red and swollen. When he goes outside things get stuck in his paw and he limps. Though I would get some padded boodies are socks. What do you think.
Thanks in advance for you help.
Hi Linda,
I am sorry your senior guy has so much trouble with his feet. It would be ok if you needed to use boots or socks just to prevent things from getting stuck in his paws while outside. But I would not plan to use them long term instead of getting to the root of this problem. If your dog’s allergies are preventing him from enjoying life and causing pain, it may be time to do some more investigation. I highly recommend you contact a veterinary dermatologist for help. They can guide you in the best way to start treating these allergies and help prevent flareups, so your pup doesn’t have to suffer. Hoping for some clear answers and relief for your sweet boy.
I have a very sensitive dog. I feed her a good gently cooked fresh diet (comes raw w natural supplements inside, but my dog likes it gently cooked and cooled) from Viva Raw Pets and I use “coat defense” powder (all natural) for dogs to control her very sensitive skin. The sensitive skin shampoo and the preventive powder is amazing for her paws and ears. I also wash her feet after walking around in all the pollen dirt and pollution on the street. My vet recommend this.
I also have eliminated all chicken products as her itching w her feet increases when she anything,
Aloha, im going to start this off with my apologies because I see that this site is for ‘senior” dogs. Although, Ili’ahi (my 4 year old male Jack Russell/ Terrier) isn’t a senior, I’m hoping anyone can help me with what to do….2 nights ago while Ili’ahi, Kealani (my 3yr old female Dotson) and I were playing at the beach, I noticed Ili’ahi started limping. I didn’t hear him cry out or yelp. Even his limp was faint and a lil difficult to notice at first. The next day, however, his limp had become more obvious and he was continuously licking his front right paw. So I picked him up so that I could take a look and try see if I could find out what was causing my lil angel 😇 discomfort. On his middle toenail there is a pretty big Crack going across his nail and its up towards the base. I don’t know what to do….I can see that he’s in pain and I just want to help him get better so that he’s happy again.
I was hoping that maybe someone has been through this sort of thing and maybe could help me figure out what to do to help him so that he can start to feel better
Hi Rachelle,
I am so sorry your boy has injured his toenail and is showing signs of pain and discomfort. Since the symptoms seem to be getting worse, and his limping has progressed, I think it is time to make a visit to your vet. They may be able to offer some medications for pain and inflammation but there is a chance the nail may need to be removed completely (it should grow back normally). I will attach links to other articles with more information. Wishing you and your pups the best!
1. Dog Split Nail: First Aid and 9 Causes
2. Help! My Dog Ripped a Nail Off!
I would also research SLO. Symmetrical lupoid onychodystrophy. I only know about it because our dog has it. It’s rare and our vet didn’t catch it right away. Our first clue was when a toenail came off. Treatment sooner than later is very important.
Hi Deb,
Great advice! Thank you for sharing your experience!
I also use a small child’s sock over the bandage to help deter my dog from chewing at the gauze. If necessary, I further secure the top of the sock with tape, but of course be careful that it isn’t too tight.
Hi Gwen,
Socks can be so helpful in these situations! I just want others to know they need to make sure they stay dry and are removed/changed often. Thanks for sharing!
my Pomerainian “Poppy “had a crush injury 10 weeks ago Her tibia was broken in a spiral fracture.
And much of the skin turned black and came off also 2 of her outside toes and her pads fell off.My vet set the tibia and put in a plate with 5 screws… at the start no one realized how much skin and paw were damaged they looked normal just bruised after a week the splint came off and all the stiches had torn out exposing the implant… fast forward 6 weeks of daily then bi daily bandage changes and cleaning &debriding. they tried stiching her again but they pulled out in a day…more daily changes letting the skin granulate.yesterday they took the plate out..her bone is only partially healed so only slow leash walks but no bandages..she now has 1 toe and 1 stub Im wondering if I should wrap the paw so sh will set it down..She was using it when it was wrapped but not now. I see my vet in 2 weeks to remove stiches if they stay in…oh also spraying with derma gel daily..
your thoughts?
Hi Trudy,
Goodness I am so sorry for all your sweet pup has endured! I am not sure that wrapping the paw would be harmful but due to all the complications that have occurred I would be afraid to accidentally cause another issue when the bandage is not necessary. I think I would err on the side of caution and just leave things alone until your vet recheck. I know this response is delayed but hope it will be helpful in the future or for others who may come across it. How is your girl doing today? Praying Poppy was able to make a full recovery and is now back to living her best life. Feel free to leave an update if you have a chance. Best wishes to you both!
My dog step on something, not sure what it was. Took her to vet but he said he couldn’t see anything wrong with her paw. She is limping not wanting to put to much weight on it. I looked and could see dried blood between her toes. When I wrap her paw should I tuck the non-stick gauze with ointment on it in between her toes to make sure the med is touching the wound? I’m hoping that the bandage will give her a little relief.
Hi Alice,
I am sorry your pup has injured her paw. Yes, I do like to make sure the non-stick pad is directly covering the wound to prevent the bandage material from getting stuck to it. I know you mentioned your vet has looked at the paw and did not find any abnormalities. Was the wound present at the time of the exam or did it open up afterward? If your vet did not get to see the wound it may need to be rechecked. I worry about the possibility of a foreign body such as a splinter or grass awn that could still be deep in the tissues. Hoping the wound will heal and your girl will be back to normal in no time. Best of luck!
My biggest problem has always been the bandage sliding off.. Any more suggestions on preventing that are so welcome!
One question, it’s been my understanding that Betadine is no longer recommended for cleansing as it is irritating to the tissue (at least with horses) and can delay healing.. Is this true with canines?
Hi Karen,
Betadine is not my favorite but is still a good option if it is the only thing you have on hand. If applied full strength it can definitely cause tissue damage. If used, it should be very will diluted so it is a light tea color. Once diluted, the effects to healthy tissue are very mild. Hydrogen peroxide is similar as it also causes some mild damage to healthy tissue and can delay wound healing.
Our doggies depend on their four paws so it is so important, as you describe Dr. Buzby, to protect those paws and get them healed from injury 🙂 In addition to your awesome suggestions, if comfortable for the dog, I like to do figure 8s between some of the toes and then of course, always wrap that gauze above the first joint to prevent the dog from walking out of the bandage. Around the paw, between two toes, around the paw and between toe other toes to secure the rolled gauzed in place 🙂
Hi Denise,
I have never wrapped gauze between the toes, but I can see how it could help keep the bandage secure. I usually leave the two middles toes sticking out of the bandage and ask my clients to watch them for signs of swelling. One way to visualize swelling is when the toes start to separate and push away from each other. I worry that if there is gauze between the toes, they will already be somewhat separated, making it harder to tell if swelling is present. You definitely have me intrigued! Thank you for sharing your experience with our readers.