If you are new to administering subcutaneous fluids for dogs (i.e. SQ fluids), you may be feeling a bit overwhelmed by the process. But help is here. Integrative veterinarian Dr. Julie Buzby provides detailed step-by-step instructions (complete with pictures and video). Also, she answers some common FAQs to empower you to confidently give your dog subcutaneous fluids.
Finding out you need to give your beloved senior dog subcutaneous fluids can come with a mix of emotions. On one hand, it is something concrete you can do to help your dog. But on the other hand, it involves sticking a needle in your dog and using a complicated-looking fluid setup.
I understand that the idea of giving your dog subcutaneous fluids can be a bit intimidating. But it doesn’t have to be. This article provides a step-by-step administration guide and answers some FAQs to take the fear and mystery out of giving your dog subcutaneous fluids. I know you can do it!
If you are looking for the answer to a specific question regarding fluids, you may want to skip to the FAQs section (or if you don’t see the answer there, call your vet). Otherwise, let’s start looking at the nuts and bolts of the process.
What equipment do I need to administer subcutaneous fluids?
The first step to learning how to give fluids to your dog is ensuring you are prepared and have all the materials ready. Your vet will give you most of the supplies you need, but there are some things you can gather from your home that might make the process easier.
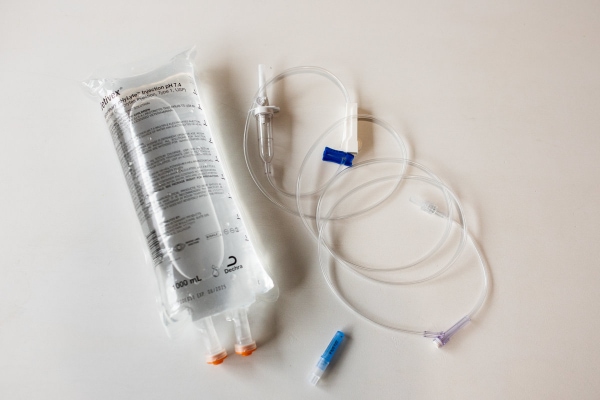
To set up the fluids, you need:
- Coat hanger or some other way to hang the fluid bag
- Bag of fluids
- Drip set (also called a fluid line or extension line)
- Needle (usually an 18 gauge)
- Sharpie
- Paper towels
- High value rewards for your dog
- Someone to help you restrain your dog (if necessary)
- A blanket or towel if your dog likes being wrapped up
- And of course, your dog
How do I assemble the subcutaneous fluids set?
Now that you have your materials gathered, you are ready to follow the steps to set up the fluids.
(Note: These instructions start you from “square one” of assembling the fluid administration set. However, it is possible that the veterinary team may have already done some of these steps for you. Also, it is worth noting that your vet might have demonstrated the technique in a slightly different order. There are multiple ways to arrive at the same endpoint.)
Attaching the fluid line to the bag
1. Remove the fluid bag and fluid line from their packaging.
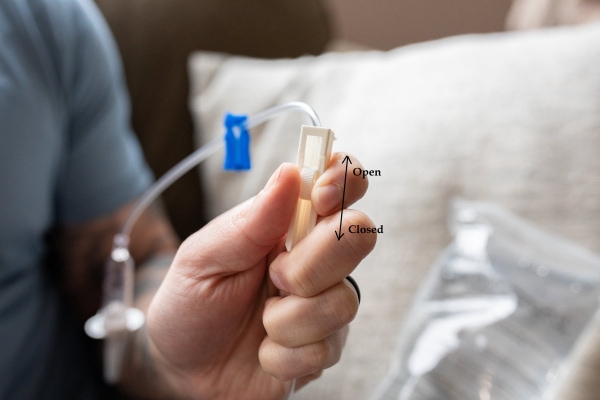
2. Examine the fluid line. There is usually a white “lock” (i.e. clamp or fluid rate controller) with a rolling mechanism on the line. Typically, this flow controller is set in the “open” position. You can tell that it is “open” because the clamp will slide up and down the line. Close the clamp by moving the roller all the way down. This will squeeze the tubing to close the line, and the clamp should no longer move.
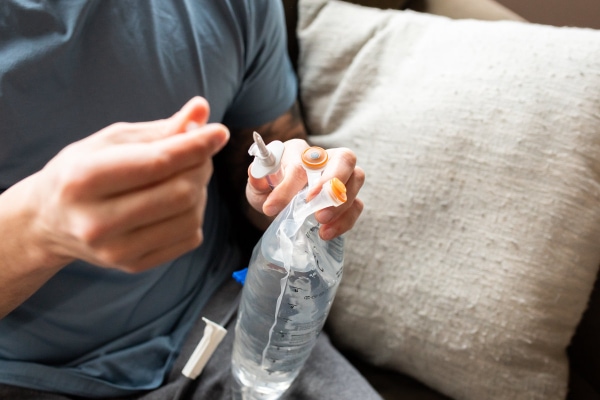
3. Next, pick up the fluid bag. On one end there is a rubbery tab (usually it is white) or a plastic cap. Remove this cap or tab from the fluid bag and set it aside (or throw it in the trash as you won’t need it again). You may need to pull fairly hard on the tab to get it off. Be careful not to let the newly exposed opening on the fluid bag touch anything because this part should remain clean.
NOTE: You can do this while the bag is hanging or lying on the table as no fluid will leak out until the bag is punctured by the fluid line.
4. Go back to the fluid line and look for the end with a pointy, plastic tip that has a cover on it. Remove the cover from the tip. Be careful not to touch the pointed part as it needs to remain clean.
5. Insert the white pointed end of the fluid line into the fluid bag where you opened it in step 3. You may have to use a forceful twisting motion to push the point all the way into the bag. It is important that the point is secured properly to prevent leaks from occurring.
NOTE: Now the bag is punctured and has a hole in it. You do not want to remove the fluid line from the bag, otherwise the fluids will spill.
Hanging the bag up and marking the fluid amount
6. Now that the fluid line is attached to the fluid bag, you can hang the bag up (if you haven’t already). This is where a coat hanger can come in handy. Alternatively, you can hand the bag to your assistant.
TIP: If you hang the bag higher, gravity will assist you and make the fluids flow faster (therefore making the administration faster). But, you want to still be able to see the bag to monitor the amount of fluids given. Ideally, the bag would be about three feet above your dog’s back.
7. Look at the lines measuring the fluids on the bag and determine how many milliliters (mls) of fluid each line represents (usually 100 ml, but could be 50 ml for a smaller bag). Then use a Sharpie pen to make a line indicating the “stop point” that corresponds to the volume of subcutaneous fluids you need to give your dog. This dosage will vary with each dog and will be based on your veterinarian’s recommendations.
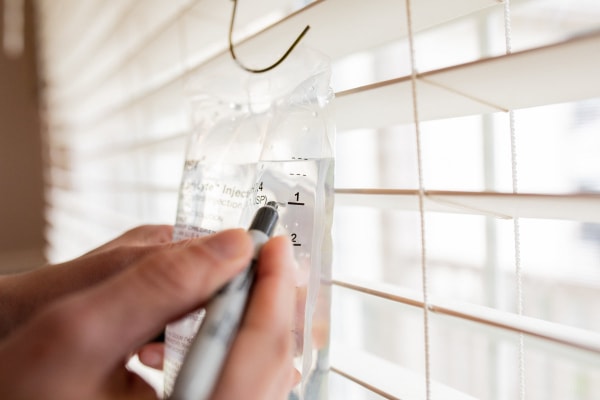
NOTE: It is much easier to measure the amount of fluids before you start administering them. Try to remember to take the time to do this first.
Preparing the fluid line
8. Look for a clear chamber on the fluid line at the end closest to the bag and squeeze the bulb to allow fluids to fill the chamber about halfway.
NOTE: Depending on how you have the bag positioned, squeezing the bulb can add or remove fluid from the chamber. If the bag is upright (i.e. with the chamber below the bag), squeezing the bulb will cause more fluid to enter the chamber. But if you turn the bag upside down so the chamber is on top and then squeeze the bulb, it will push some fluid back into the bag. This is helpful to remember if you accidentally fill too much of the chamber with fluids.
9. Now look at the end of the fluid line not inserted into the fluid bag. There is a plastic cap covering this end. Carefully remove the cap. Be sure not to touch the end of the line, as this should remain as clean as possible too. Also, keep the cap clean and nearby because you may need it later.
10. Open the fluid flow control clamp on the fluid line by rolling the circle upward. Allow fluid to flow through the line until the entire line is filled and a small amount of fluid drips out of the uncapped end. Then close the clamp to stop the flow of fluid.
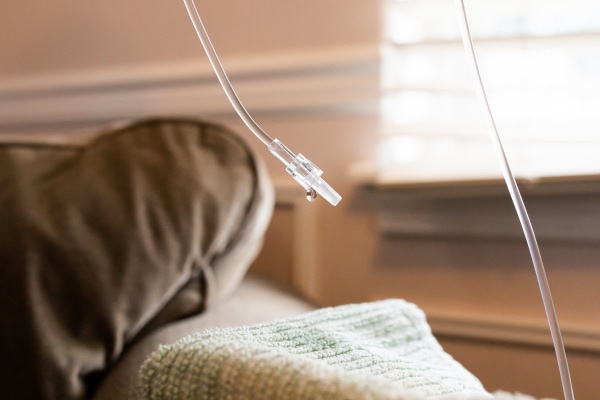
NOTE: This step helps ensure you don’t accidentally inject air under your dog’s skin when you first start running the fluids. A few bubbles of air under the skin aren’t a big deal, but a fluid line full of air can be uncomfortable for your dog until the body absorbs it. Thankfully, it isn’t usually dangerous, though.
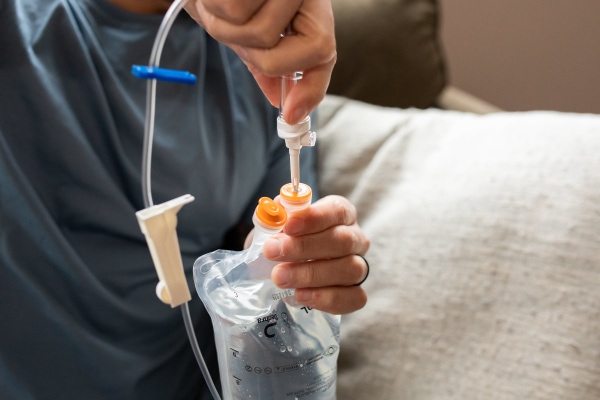
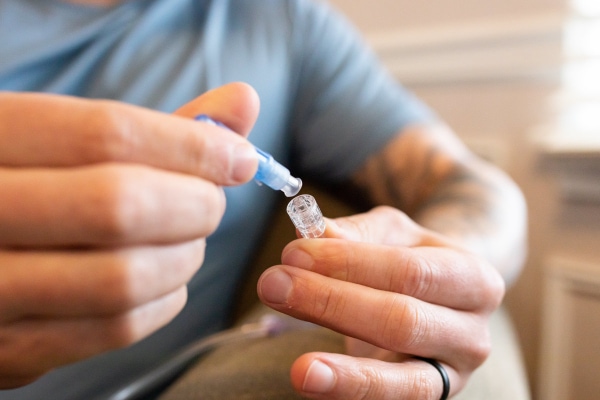
11. Either temporarily replace the cap on the fluid line or hold onto the fluid line close to the end to keep the tip from touching anything. Then pick up your needle and remove the clear cap at the base or peel away the paper and plastic wrapping to expose the hub of the needle. This end should be kept clean too.
12. Attach the exposed base (i.e. hub) of the needle to the exposed end of the fluid line. Be sure it is firmly attached to prevent leaks or the needle falling off. Some fluid lines also have a locking collar that you twist around the base of the needle once you attach it, but others do not. Both types work fine.
How do I give subcutaneous fluids to my dog?
Now that the fluids are fully assembled, you are ready to give them to your dog.
Preparing yourself and your dog
1. Choose a location that is comfortable for you and your dog. If your dog is small, I recommend having him or her on a table or in your lap. Some of my clients will even wrap their small dog in a towel to help him or her feel secure and safe. On the other hand, large dogs usually do best standing on the floor or lying down—either in a dog bed or nestled between your outstretched legs.
NOTE: The fluid bag should be hanging about three feet above your dog as mentioned above. Make sure the needle on the fluid line can easily reach your dog without any tension in the line.
2. Properly restrain your dog so he or she is not moving around a lot. A high-value treat can provide extra encouragement for your dog to stay still. One of my favorite tricks is to wipe peanut butter on the wall at the level of the dog’s nose. Then, the dog will stay in one place and be busy licking the peanut butter instead of paying attention to you and the fluid therapy.
If you need help keeping your dog still, ask a friend or family member to assist you. They can give your dog a gentle hug by wrapping one arm under the dog’s neck and placing the other arm over the dog’s back or around the dog’s back end.
TIP: Finding ways to keep your dog still is quite helpful. The more your dog moves, the slower the fluids will run. Also, if your dog is still, he or she is less likely to notice the fluids being administered.
Inserting the needle.
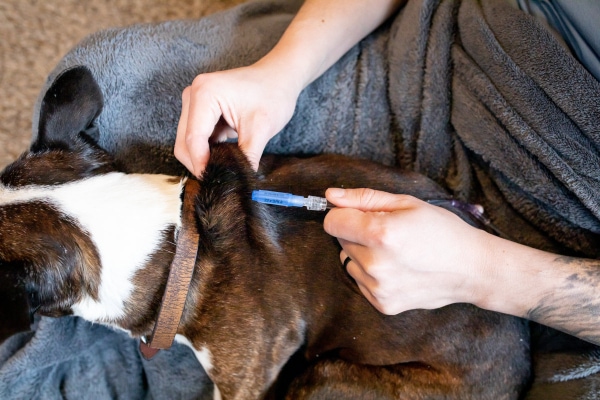
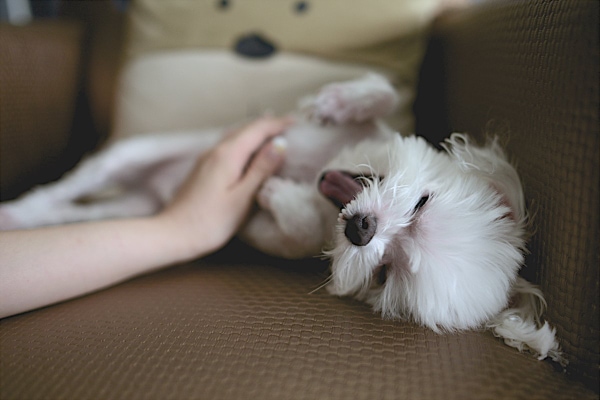
3. Locate the loose skin that is between your dog’s shoulder blades. This is where you will insert the needle. (It is also possible to give SQ fluids over your dog’s hip, but this location tends to be used less commonly.)
4. Carefully uncap the needle. (Save this cap for later).
5. While holding the needle in one hand, use the other hand to gently pinch and slightly lift the loose skin between the shoulders to create a “tent.” I like to squeeze, rub, and wiggle the skin a bit as I hold it up. This is a good way to distract your dog from the needle poke.
6. Hold the needle at the base of this tent and begin inserting the tip of the needle into the skin at a 30 to 45 degree angle. Fully submerge the length of the needle under your dog’s skin. Then release the tent but continue to hold the needle in place.
TIP: Inserting the needle should be a firm and steady motion. You do not want to jab it in or go slowly and shakily. If you want to practice inserting a needle before administering fluids to your dog, try performing the same motion on an orange or banana. This will give you a feel for how much pressure to use. (Be sure to discard these practice needles because they will be too dull to use on your dog.)
Administering the fluids
7. Use one hand to continue to hold the needle in place. Use the other hand to release the rolling lock of the clamp on the fluid line. You should begin to see the fluids dripping into the chamber and flowing through the fluid line. The clamp should be “wide open” so that the fluids are running quickly.
TIP: If fluids are dripping down the side of your dog instead of going under the skin, you may have accidentally pushed the needle out through the other side of your dog’s skin. Simply withdraw the needle slightly so that the tip is under the skin again and continue giving the fluids. If that doesn’t work, temporarily shut off the fluids, withdraw the needle, and insert it into a slightly different location.
8. As the fluid therapy continues, keep your dog still and calm. Use a gentle voice to reward him or her for standing still.
TIP: If the fluids are running slowing, try to gently reposition the needle under the skin or change the angle without removing the needle. Also, ensure the clamp on the fluid line is open all the way.
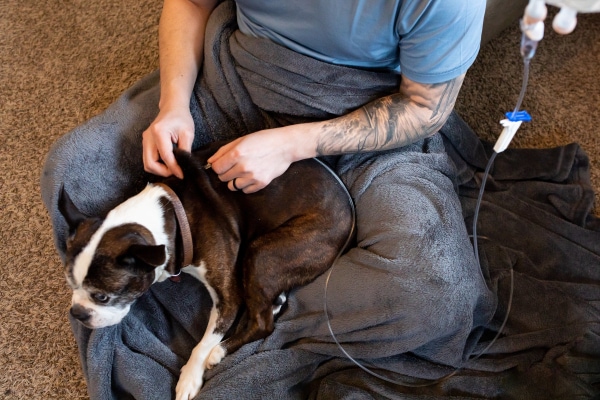
9. Keep an eye on the Sharpie line you made earlier to monitor the fluid volume you have given so far, and keep a hand on the needle at all times.
NOTE: Sometimes you will give the full volume of fluids in one location. Other times your vet may instruct you to divide the fluid volume up over multiple areas. If this is the case, follow the instructions for shutting off the fluids and withdrawing the needle (steps 10 and 11) and then repeat the fluid administration process starting with step 5.
Removing the needle
10. When the fluids reach the line you’d made with the Sharpie pen, then your dog has received the full dose. Next, roll the lock of the clamp on the fluid line back into the closed position. Once the fluids have stopped flowing, use one hand to completely back the needle out of your dog’s skin.
11. Once you have removed the needle completely, use your fingers, gauze, or a paper towel to put pressure on the spot where the needle was. This will help prevent bleeding or fluids leaking out.
12. Carefully place the cap back on the needle. Pay close attention to what you are doing because recapping the needle is when most people accidentally poke themselves.
13. Reward your dog for being so good during the procedure. And pat yourself on the back because you have finished the hard part. All you have left is to put things away.
Putting the fluid set away
14. Remove the needle (with its cap on) from the end of the fluid line. Replace it with a new clean needle as described above. This will help prevent bacteria from growing in the fluid set and ensure you always have a clean, fresh needle for the next time.
15. Double check that nothing is leaking and that you have properly capped the needle. Store the bag at room temperature in a safe place until it is time for the next dose. Since the fluid set is already assembled, you can make your new Sharpie mark for the next time. Then you’ll be ready to start on step 1 of the “how do I give subcutaneous fluids” when the next fluid needs administered.
Phew! You did it! Hopefully, administering subcutaneous fluids wasn’t as difficult or scary as you thought. But even if you did struggle with it the first time, remember that it should get easier as you do it more often. You can always consult with the veterinary team if you need some additional help.
Also, you may want to watch the video below.
How to give SQ fluids: A step-by-step video tutorial
To help you feel more confident and add to your knowledge base, I’ve created this step-by-step video tutorial of how to give subcutaneous fluids to your dog at home. Check it out, and then read on for answers to eight FAQs.
Fluid FAQS
After you finish giving your dog the fluids (or before you start), you might also have some questions that pertain to aspects other than just how to administer the fluids. Hopefully, you will find the answers in my fluid FAQs section helpful. If not, or if you have other concerns, please reach out to your vet.
FAQ #1: Why might my dog need subcutaneous fluids?
Vets use fluid therapy to treat a variety of conditions. In the hospital setting, the vet can administer either subcutaneous fluids or IV (intravenous) fluids. SQ fluids are great for dogs who are mildly dehydrated and need a quick and easy fluid boost before heading home with their parents. On the other hand, the vet will use IV fluids for dogs who are sicker, undergoing anesthesia, or hospitalized.
In the home setting, IV fluids would be difficult to administer and potentially dangerous. However, subcutaneous fluids are safe and simple to do at home.
The most common use for at-home subcutaneous fluid administration is to help improve quality of life and slow disease progression in cases of chronic kidney disease in dogs. However, the vet may also recommend it for other conditions that cause dehydration.
FAQ #2: Are there alternatives to subcutaneous fluids?
Other than in-hospital IV fluids (as mentioned in FAQ #1) and subcutaneous fluids, the other way to get more fluids into a dog is oral fluid therapy. This may involve:
- Ensuring the water dish is always full of fresh, clean water to promote drinking
- Adding water to dry food
- Feeding canned food since it is about 75-80% water
Sometimes these measures can be sufficient in the early stages of kidney disease in dogs or for other minor issues. However, there often comes a time when the dog needs more fluids than oral fluids alone can provide. This is where subcutaneous fluids can come to the rescue.
However, this doesn’t mean you have to do the subcutaneous fluids at home. Another option is to bring your dog to the veterinary clinic and have one of the veterinary team members administer the fluids if you would be more comfortable with that approach.
FAQ #3: What are the side effects of subcutaneous fluids in dogs?
Thankfully, fluids are very safe, and the side effects are minor.
Migration of the fluids
The most common thing that dog parents notice right away is that their dog might look like he or she has a camel hump. This is completely normal! The hump is where the fluids are sitting because they haven’t been absorbed yet.
You may notice this hump stays between the shoulder blades, falls to the side so your dog looks lopsided, or sometimes even divides between two or three places or slides down to the chest or legs. Over the next four to six hours, the fluids will diffuse and be absorbed, and the hump will resolve.
If the subcutaneous fluids are not fully absorbed by the time you are supposed to give the next dose, please contact your veterinarian before administering any further fluids. Based on the information you provide (or an examination if warranted), your vet can advise you on how to proceed.
Bleeding or leaking at the administration site
The other side effect dog parents may notice is bleeding or leaking at the site where the needle was inserted. This happens sometimes and is not usually a concern. If the skin becomes tight from all the fluids, some of the fluid may squeeze back out. Or sometimes the needle may accidentally hit a small skin blood vessel and cause your dog’s skin to bleed (just like if we got poked or bit by a bug).
If this happens, apply pressure to the area for about 30 seconds and the leaking or bleeding should resolve. If it doesn’t, or you have questions or concerns, please contact your veterinarian.
Minor pain or soreness
Additionally, some dog parents notice that their dogs seem to be painful or irritated at the spot where the needle was inserted. Just like when you get a vaccine, sometimes the area can be a little sore.
If you think the fluid “hump” is uncomfortable for your dog, you can try massaging the area gently to release some of the tension. Or, if the injection site seems to be bothering him or her, you can also apply a cold pack wrapped in a towel for two to three minutes.
However, if you think your dog is unusually painful after subcutaneous fluids, please don’t hesitate to reach out to your vet for reassurance and guidance as well.
FAQ #4: How much subcutaneous fluid should I give my dog?
Your dog’s veterinarian will help you figure out the volume and frequency of subcutaneous fluids that is best for your dog. This will depend on your dog’s size and the reason for the fluids, among other things. The fluid volume or frequency may also change as your dog’s kidney failure, or other condition, progresses.
FAQ #5: Is it normal for my dog to pee a lot after subcutaneous fluids?
Yes, some dogs will urinate more after fluid administration because they are no longer dehydrated. If this happens, it is a good sign because it means that the fluids have been absorbed and are working. But if you become concerned that your dog is peeing too much, please contact your veterinarian.
FAQ #6: Will my dog still drink water after subcutaneous fluids?
Since you gave your dog some fluids under the skin, he or she may or may not feel the need to drink as much water for a bit. However, clean, fresh water should always be readily available for your dog in case he or she wants it.
FAQ #7: Will my dog be tired after receiving subcutaneous fluids?
Your canine companion might be tired or even a rather lethargic dog after receiving fluids (especially if he or she is easily stressed). It is okay if your dog wants to rest for a few hours after therapy. If the lethargy continues or you notice other symptoms, please contact your veterinarian.
FAQ #8: Can I warm up the fluids before giving them to my dog?
While you should always store fluids at room temperature, sometimes warming them up can make administration less uncomfortable for your dog. To warm up the fluids, fill a sink or large bowl with warm water. Place the fluid bag in the water upside down (with the connection between the bag and line out of the water) for five to ten minutes until the fluids are approximately body temperature (or a bit cooler).
Safety note: Do NOT microwave the fluids. They can become too hot for your dog and can burn him or her (and you).
The veterinary team is here to help
I hope that you now feel more confident in your ability to give your dog subcutaneous fluids. While it may feel outside your comfort zone at first, I believe that you can do it!
However, if you have tried administering subcutaneous fluids at home and it wasn’t for you, I want you to know that’s ok too! Whether you (or your dog) aren’t a fan of needles, it was difficult to restrain your dog, or something else happened, giving fluids can be challenging.
If you encounter some bumps in the road, please discuss your experience with your veterinary team. They would be happy to give you more tips in person if you want to keep trying. Or, if you have decided it is best for you and your dog not to keep doing SQ fluids at home, they can help you develop a new plan.
Have you given your dog subcutaneous fluids?
Please comment below to share your experience and any tips you want to give to other readers.

I’ve been giving my 15 year old pup Bijou sub q fluids for 3 weeks now and it seems to be really helping. She’s getting used to the routine. She was diagnosed with kidney failure and I have her on a kidney diet plus myriads of supplements. My question is I just opened a brand new 1000ml Vetivex bag yesterday and it fell on the floor and got a leak in the bag. What do I do with it? Is there an alternative way to administer the fluids or is it sterile compromised and I need to throw the whole bag away now? I don’t want to waste fluids if they’re still perfectly good. Let me know what the right thing to do is please thank you! Molly:)
Hi Molly,
I am sorry Bijou is facing these ongoing kidney issues but glad you are going the extra mile to maintain her quality of life. If the bag fell on the floor and leaked, then the sterility is definitely compromised. While the probability of introducing infection at the injection site may be relatively low, I am not sure I would risk it. If something like this happened at the clinic, we would trash the whole bag and open another one. Wishing you and Bijou all the best. Keep up the good work!
We’ve been giving my 4-kg Papillon SQ fluids to treat stage four kidney failure for about six months. He’s extremely docile and calm throughout the procedure. As his skin has become tighter, it’s been harder to find good needle sites. The biggest problem we’ve faced is leaking while administering the fluids. I realized that the needle was going through and through because when I lifted (tented) the skin to insert the needle it lifted in a small pyramid shape rather than an elongated prism-like shape. Now I know to check for that and change my grip as I lift the skin if needed. No troubles since then.
I would have liked to have known that could happen earlier, so I thought I’d share it here for others.
I also have a question: In the past 6 months, we’ve missed our dog’s SQ administration on two days (relatively far apart). But I was wondering how many days in a row it’s safe to miss. He was diagnosed in May, is stage four now, and is in a slow decline but relatively stable.
Thank you!
Dear Melissa,
I understand your concern for your pup as his health continues to decline. He is very lucky to have you taking such good care of him and advocating for his well-being. I applaud you for taking on this type of treatment at home and sticking with this commitment for so many months. Unfortunately, there is no way to know exactly how much these extra fluids are affecting the kidney function (without running expensive daily blood tests) and therefore we also aren’t sure what the negative effects will be if the fluids are missed for a few days. The only thing you can really assess at home is how often your boy is urinating, if the color of the urine looks extremely concentrated or dilute, and whether his gums are nice and slick or if they are staring to become sticky/tacky and dry. Missing a day or two is probably not life threatening, but things can change quickly. How is your boy doing today? Hoping he is still by your side and enjoying life. Praying for your strength and comfort. Bless you both.
We just starting giving our 11 1/2 year old Golden these fluids. The first time we did it she was not able to relax and lay down. She would keep getting.up every few minutes including at night. Not sure if we did something wrong. She did not have this reaction when it was done at the vet. She didn’t sleep at all at night and kept us all up.
Hi Kathy,
Sorry to hear that you and your dog both had a sleepless night after trying the subcutaneous fluids at home. That would definitely be stressful! Has she had any other episodes of nighttime restlessness in the past? Dogs can sometimes get a bit sore from the needle insertion or the fluids themselves but generally I wouldn’t expect it to keep a dog up all night in most cases. I suppose though that if she already has some arthritis pain, doggie dementia (canine cognitive dysfunction) or other condition, the combination of that plus some discomfort from the fluids could have been enough to push her over the edge. Alternatively, it is quite possible that it was just coincidence that she was restless after the fluids. If this continues, I’d recommend reaching out to your vet. Since he or she can examine your dog and knows your dog’s history, your vet can help you get to the root of the issue. I hope things improve soon and you both are able to get some rest!
Also, you may find this article helpful: Senior Dog Anxiety at Night? 9 Solutions for Better Sleep
Thank you for answering this question. We have been giving our 16-year-old lab fluids for about 3 weeks. Last night he did the exact same thing; pacing all night and was obviously uncomfortable. He was up so we were up. He does have a history of what I called “doggo sundowners” and arthritis which we usually medicate him for when he has espisodes. This really cleared up some questions for us. Thank you.
Hi Marie,
So glad you were able to find the support and peace of mind you needed! Your boy is very lucky to have you taking such good care of him and going the extra mile to ensure he remains happy and healthy. Wishing you both all the best and praying for continued success. Keep up the good work!
Dr. Buzby,
We are just beginning this journey with our stage 2-3 Border Collie. She is 10 yrs. Old. I wanted to thank you for your video and hope we will be able to do this. we cant afford to keep taking her to the vet for the fluid administration. But I know we will do everything to make her life better. We pray she will stay with us much much longer.
Thank you again,
Hi Craig,
I have faith that you can learn how to administer the fluids to your dog! I know it seems intimidating at first, but soon it will become second nature to you and to her. It hope it goes well and helps her to feel like herself for as long as possible. If you have questions, feel free to reach out to your vet or to me. We are here to help!
Hi Dr. Buzby, thanks for this information, it helped me understand a few things better. But I am searching for an answer about whether a dog’s body, if it is recovering, does not absorb as much sub-q fluid? I have a 12-year old mixed breed female, spayed, who was originally 70 pounds. She had pneumonia from what seemed to be mega-esophagus in April and was then diagosed with stage 2 kidney disease, heart murmur, splenic mass (could be benign or cancerous). 500 ml of Ringer’s a day was recommended after she had a 3-day IV treatment in the clinic (in addition to other drugs). She originally could take the whole 500 ml but cannot any more. The fluid stops dripping and her skin on the back of her neck is very tight at 300ml the last week, and today it stopped at 250. I am stopping it and removing the needle when this happens. She has regained about 4 pounds of the 14 pounds she lost and at times seems cheerful and energetic an other times lies sleeping but breathing too fast so wonder if she is in pain. .I say this because I think she is recovering some but not sure because her bloodwork has not been done for several weeks. .And maybe other pet parents giving sub-q fluids have this happening too.
Hi Ellen,
I understand your concern for your pup and think it is good you are reaching out for advice. Unfortunately, without being present while the fluids are being given it is hard to troubleshoot this issue or make specific conclusions. There are reasons that a dog’s body would not adequately absorb subcutaneous fluids, but recovery should not cause this problem. I think it would be best to contact your vet and explain what is happening. They may want you to bring your girl in for a recheck and have you demonstrate your fluid administration process so they can narrow down the problem. Hoping you can get things back on track and wishing your girl all the best.
I have a sweet and wonderful Aussiedoodle, Annie. She is not yet seven years old and in stage 4 kidney failure. She was born with highly detective kidneys. I only found out four weeks ago. She was immediately hospitalized and given IV fluids for 24 hours. Her numbersimproved and they sent me home with sub Q fluids, an appetite stimulant, an antacid and medication to sooth her tummy. I was told she likely only had weeks to live. I am utterly devastated. She’s been doing fairly well and, three weeks later, has actually gained a pound, though she refuses to eat any of the kidney specific foods. At this point, my main concern is just getting any food down her at all. But my main question is what is the best time of day to give the sub Q fluids? I’ve done it late morning after her breakfast or late afternoon around 6 PM. Is there an optimal time?
Hi Monica,
I am sorry Annie has received this difficult diagnosis. What a blessing she seems to be responding to the treatment and you are seeing signs of improvement. I am not aware of any specific guidelines for when fluids should be given. It should offer the same benefit no matter what time of day they are administered. Hoping for continued success and wishing you and your sweet girl many happy days ahead. Keep up the good work!
Your scenario sounds like ours. Our 6 year old golden retriever was diagnosed stage 4 kidney disease. Our vet was shocked based on her appearance, however she is deteriorating quickly and getting her to eat is the biggest issue. I’ve tried everything. The odd time she will take a few sniffs and a bite. I even offered her homemade spaghetti tonight and she did eat some. At this point, I just want to keep her comfortable and love on her all we can..
How long were you able to hold onto your pooch?
Dear Robin,
My heart aches for you as you face these final days with your beloved pup. Wishing you all comfort and peace. Bless you both. ♥
Hi, we are supposed to be giving our pup Sub Q fluids, but are having alot of difficulty because her skin is very firm/ tight so there is not alot of extra skin to create the “tent”. Also she is very sensitive and crys loudly, and wiggles to get out of our grip, which causes more cries. Treats don’t work.
I was able to do it once successfully but now the needle is no longer going in deep enough, perhaps it’s because her skin is so tight I’m only able to find one small place to inject and maybe it formed a scab? What do you do in this instance if the dog doesn’t have alot of extra skin? Please advise! thanks so much!
Hi Jai,
I am so sorry you are having difficulty with the subq fluids. Honestly, some dogs are just not great candidates for this type of therapy due to the sort of issues you mention (tight skin and sensitive to the needle placement). Please make sure your vet is aware of these problems. It is hard to offer advice without witnessing things firsthand. They may have you bring your girl into the clinic so they can watch your technique and offer guidance on how to troubleshoot these issues. Hoping you can get things worked out and ensure your girl is getting the fluids she needs. Take care and best wishes!
I began sub Q fluids on my miniature schnauzer, Zoey. She is a champ and we have been through much. She was diagnosed with kidney disease about 6 years ago and did fairly well on Enalapril and HTZ. She got sick last week and her kidney numbers were bad. We kept her in the hospital and began using a phosphate binder. Miraculously, her creatinine numbers were in the normal range after a day or two of treatment. She came home and we started the fluids today. She gets 100ml, 3x a week. This morning she wagged her tail a bit before we went outside. She is eating, holding her food down, her diabetes is now stable. I figure I will make her comfortable and attempt to give her a reasonable quality of life. I am blessed each day that she is with me. She will tell me when it’s time to go. It is heartbreaking, but, we do what we have to do for them. I always say we don’t deserve dogs, they are too good to us. Thank you for writing your articles and this one was extremely helpful.
Hi Flo,
I am sorry Zoey is facing so many challenges at once but glad to hear she is responding well to the treatment. Thank you for sharing your experience with us and I truly appreciate the kind words about the article. Praying your sweet girl has many happy days ahead and wishing you both the best! Take care and keep up the good work.
I’ve been administering subcutaneous fluids 3x per week now to my son’s mini-golden doodle for about 3 months. While the dog sits still for the fluid drip, she is now anticipating the injection of the needle and whinces slightly after the initial injection. I’ve been using 19 gauge Terumo needles and slightly warming the fluid to room temperature. Do you have any suggestions for lessening the pain from the injection? I’m doing my best for a steady quick movement of inserting the needle. I read somewhere that freezing the needles may help. Your thoughts on that? I would think a cold needle would be more startling. Any suggestions would greatly be appreciated. Thank you!
Hi Janice,
I applaud you for your effort and persistence in giving these fluids to your son’s dog for so many months! You could try applying a cold pack to the injection site before you insert the needle to see if it can numb the skin a bit and lessen the associated pain. I also like to offer a high value treat while inserting the needle in hopes that the dog pays more attention to the treat than what I am doing. While larger gauge needles help the fluids to flow faster and shorten the time it takes to administer the fluids, it may be helpful to switch to a smaller needle (at least for a while) and see if that decreases the discomfort. I hope you can find some tricks to try and wish you all the best of luck. Feel free to leave an update if you have a chance and keep up the good work!
Thank you for being so thorough in showing and describing how to administer subcutaneous fluids to a dog. Our little 10lb maltipoo was recently diagnosed with Addison’s Disease and also has pancreatic and allergy issues and while working with our vet to find the right cocktail of medications I’ve had to learn how to give SC fluids to our Mozart every 3 days and your video and blogs have been a God send in teaching and keeping me calm. I’m trying to find alternative fleshy areas to alternate the poke and was wondering if the hip areas are more painful than the between the shoulder blades. Tks Renate – NC
Hi Renate,
Thank you for the kind words and positive feedback. I am so proud of you for taking on this intimidating task! You are doing a great job and I know your pup is benefiting from the fluid therapy. The hip area can be a good place to administer fluids. Really any spot with some extra skin can be used. Placing the needle in the skin over the hips should not be any more painful than between the shoulder blades, but as with all treatments, some dogs have preferences and may react stronger to one location than another. You’ll have to give it a try and see what Mozart thinks about it. Wishing you continued success and keep up the good work!
Hello, my 17yro yorkie has been receiving LR for few months and everything was fine.
Our vet suggested to switch the LR to NS due to increased potassium found in the blood test last weekend.
However, my yorkie started to whine while receiving the NS injection. He was moving around trying to escape too.
These things happened on the first two days when i gave him NS injection, so i tried giving him LR injection today and he does not whining / moving around anymore.
Is this normal reaction when receiving NS subcutaneous injection? Should i try giving him NS again tomorrow?
His appetite / behaviour/ urination/ stool everything is normal after the NS injection, only seemed pain / discomfort when the NS was running under his skin.
Thank you very much and looking forward for your reply.
Have a great day!
Hi Essie,
I am sorry your Yorkie has been exhibiting signs of pain when using the saline for subcutaneous fluids. I am not aware of saline causing discomfort or pain when injected but guess anything is possible. Please make sure your vet is aware of this behavioral reaction. They may decide to try something else or discontinue the fluids all together. I also wonder if there isn’t some small change you could make to decrease your dog’s pain response. Ask your vet about potentially warming the fluids before administration or changing the site where the needle is being applied. Hoping you can find a way to maintain your senior guy’s quality of life and ensure he gets the fluid therapy he needs. Best wishes and good luck!
I wanted to say thank you so much for this walkthrough. Like you said, I had watched the tutorial at the Vet’s office, and came home worried. You gave me the confidence to do it. Now my dog who wouldn’t drink is now on the road to getting hydrated so she can get thru this weekend and to her surgery on Monday. I very much appreciate you. Thank you again.
Hi Ryan,
Thank you for the kind words! I am so proud of you for pushing through your fear and conquering this task. You’ve got this! Hoping surgery goes smoothly tomorrow and praying for a positive outcome.
Hello, my dog is having subcutaneous fluid 4 times in 14 days. His last latest creatinine level was 1.7 and his BUN was 45. I noticed that he is not drinking water a lot so I always forced him to drink water using a syringe. Is it normal that he is not drinking a lot of water while he is in subcutaneous fluid? Thank you.
Hi Catherine,
I understand why you are worried about your dog and his decreased water intake. Without examining him myself it is hard to determine if this is cause for concern or not. Generally, I would not think you would be able to give enough subcutaneous fluids to make drinking water unnecessary, although anything is possible. Please make sure your vet is aware of this issue. They can assess your boy and make sure his hydration status is normal and intervene if needed. Hoping all is well and wishing you both the best.
Hello Dr. Buzby,
Thank you for your video on administering subq fluids at home. My vet sent me home with fluids to administer 50cc every 48hours. I was nervous and had a friend come over the first time to assist and it went smoothly with no issues. I tried it for the first time yesterday and when I inserted the needle she yelped. she moved a bit but my parents were there to help calm her and keep her still. I got all the fluids in there was no leakage and she was not whining or yelping while it was being administered. There was a bit a leakage when I took the needle out, no blood. I know I was nervous and I was trying so hard to not hurt her. The one yelp has kind of shaken any confidence I have, do you have any tips on inserting the needle? I’m wondering if I was shaking a bit or went too slow. The fluids were absorbed and she is doing fine this morning. The bump is gone and there doesn’t seem to be any soreness or redness around the area I injected the needle.
Thank you for any words of encouragement or advice!
Hi Cassandra,
I am sorry your girl reacted a bit when you inserted the needle. This happens quite often (even for someone like me who does this a lot) and I can assure you the pain was very minimal and temporary. What I have found that works the best is to try and cause some distraction. You can try to offer a high value treat, have someone pat her head with just a little force to each pat (like burping a baby), or even pinch the area a bit so she feels the pinch and not the needle. If none of that works well for you, please reach out to your vet. They may be able to change the gauge of the needle you are using to see if it helps things go smoother. I applaud you for taking on this challenging task and I am certain you can do this! Wishing you all the best of luck and keep up the good work!
I give my little chi sub q fluids everyday. Is it ok to miss a day? My dog needs two people for the procedure as he can be difficult and I won’t have help for a day. We gave him a little extra today.
Hi Angela,
While skipping a day is not ideal, in most cases this would not cause an issue. It all depends on how critical your pup is and what medical issues he is facing. Ultimately, it sounds like you really don’t have much of a choice. If you have lingering concerns about missing a day of fluids, don’t hesitate to reach out to your vet. They can let you know if this will cause a problem or maybe offer some solutions.
It is my understanding that Lactated Ringer fluids are safe to give dogs orally in the same amount prescribed by the vet subcutaneously. Is this correct? If so, any suggestions on making it palatable enough for them to not hate it?
Hi Pet Mom,
If your dog is willing to drink fluids by mouth, then regular water is best. Lactated Ringers Solution (LRS) is specifically formulated for IV or subcutaneous use. It is not intended to be ingested by mouth and is not recommended. If you are worried about electrolytes or other nutrients then please talk with your vet about how to incorporate them into your dog’s treatment plan.
Hi Dr. Buzby,
Can you please share your thoughts on the semi-permanent ports that are sometimes installed to make sub-cu fluids easier for the owner? There is one called GIF, and I think a couple of others. My little dog just started and is sometimes fractious, though maybe he will calm down in time.
Also can you share thoughts on heart & lung issues when it comes to sub-cu fluids? My little guy had an amlodipine reaction which unfortunately forced his kidney values out of range AND caused pulmonary edema. The treatments for these two conditions are diametrically opposed. He’s been breathing well for 5 days now so I’d like to get aggressive with the kidney treatment. I know you can’t dispense medical advice but are there general rules of thumb?
Thanks!
Hi Helen,
I am sorry your pup is not tolerating the fluids very well. From what I have read, the fluid ports tend to be prone to clogging and infection. So, while they are an option you may want to pursue, I wouldn’t count on them being the long-term solution you are looking for. As far as the medical issues your boy is dealing with, fluid therapy is a very delicate balance. There really are no set rules and the treatment is tailored to how the patient responds. I am sorry your dog experienced this very rare side effect of amlodipine. It sounds like your vet is doing their best to manage all these conflicting problems occurring at the same time. Hoping things will begin to improve and praying your sweet boy can make a full recovery. Wishing you both nothing but the best!
my dog is 17 and we give her fluids at home every 4 day, 2 mils. she is now 27 lbs. losing weight. after giving fluids. she paces all night, won’t relax. goes in circles.. just wondering if anyone else have had this issue with iv fluids.
Hi Diana,
I am not sure I have ever noticed something similar to what you are describing in my own patients. I think it would be wise to relate this information to your vet. Hoping you can get some answers. Wishing you the best of luck!
Hi, im researching and looking as I have the same question while doing so came across your post. My dog is doing the same thing completely out of it, pacing staring and refusing to even lay down even though she now seems unsettled and unstable to stand. Did you come up with anything? Almost seems like a side effect of the fluids. Which company supplied them?
My old dog was on 48 hours at the vet he had kidney disease and his blood had improved a bit when I got him home the first he did was drink water but just stop he want to his water bowl, countless times to drink I try so hard to get him to have some he just would not I stay up all night try lot of things the last thing I try was putting a little bit of water in his bowl he he did drink it but had been without water for to long
Why did he drink water when he got home then could not until I put the smallest bit water in his bowl
If I did this at first or work out this within a few hours would there be a chance he would still be here
Dear Maria,
I am so sorry for the loss of your senior boy. The intensive fluid therapy he received at the vet clinic was able to improve his kidney function a bit and also helped him to feel better. This is probably why he was willing to drink some water when he first arrived back home. But his kidneys continued to decline and after his blood levels increased again, he probably started to feel bad and did not want to drink anymore. Unfortunately, this is how kidney failure tends to progress and there is nothing else you could have done to stop it. You did not do anything wrong. I hope with time your heart will heal and you will be comforted knowing your pup lived a good life. May his memory stay with you always and be a blessing to you. ♥
My dog had to have a tox screen and subcutaneous fluids and active charcoal approximately 56 hours ago due to eating something he shouldn’t have (edible delta 8 gummie)
He’s basically fine now but he’s sore on his side around his ribs still… is this Normal? Possible from the needle site or the fluid settling there?
Hi Monica,
I am glad your pup is doing ok and was able to recover from his naughty adventure! While I guess it is possible he could be extra sensitive to where the needle was placed, I am not used to seeing subcutaneous fluids cause pain in my patients. The needle stick should be similar to when receiving a vaccine and should not be an issue after the fluids have been administered. I think it would be wise to call your vet and let them know about this. They can advise you if a follow up exam is needed or if you should be concerned. Take care!
Hi I’ve been giving my dogs fluids and today when I have it to her I noticed blood coming out of her mouth. Not a crazy amount but enough to be concerning. What should I do
Hi Shelly,
Please contact your vet right away! This sounds like it could be an emergency. Hoping your pup will be ok and you can get some answers quickly.
When my vet tech showed me how to administer the fluids, they recommended squeezing the bag instead of it hanging so that the fluids move faster (22 gauge). We’ve been trying this for over a week and our pup whines and cries the whole time (which only lasts a few minutes). How would you suggest reducing pain? Is it the squeezing of the bag? Should I be warming the fluids? Any guidance would be greatly appreciated, because at this point her stress seems counterproductive.
Hi Maria,
These are all great questions and I’m so glad you are reaching out for support. Without being present when the fluids are given to really assess the situation it is hard to make specific recommendations, but I do have a couple of ideas. Squeezing the bag is very common and normally does not cause discomfort. But when you squeeze the bag, you are forcing the fluid out at a higher rate so it could be causing extra pressure and a negative sensation under the skin. Some pups are just a little overly sensitive. 🙂 You can try hanging the bag and letting gravity do the work to see if it changes how your girl responds. Also, you could use a larger gauge needle. I know it seems like a larger needle would be more painful but it’s just a tiny quick prick and then it’s over. The larger needle will allow better/faster flow and may actually increase your dog’s comfort level. I typically use an 18-gauge needle when I administer fluids to my own patients. You could even try one step up and see how it works with a 20g. I will sometimes warm fluids if I am afraid of making my patient cold or significantly dropping their body temperature. This is more common practice with very tiny dogs or animals under sedation. I am not sure the warming will prevent whining or discomfort and it is hard to get the ideal temperature without melting the fluid bag or risking a burn. You can also try some positive reinforcement while the fluids are being given. Maybe let your pup lick some peanut butter or a frozen treat (as long as the treat is compatible with your dog’s diet and medical concerns) so that fluids are associated with a fun happy experience. I hope this will help guide you a bit. Wishing you both the best and keep up the good work!
I am presently administering Sub-Q fluids to my 7 pound Min-Pin Lucy. I have always had an aversion to needles used in the medical practice, but it was explained to me that this is her only opportunity at a longer life due to her advanced stage 4 kidney failure. I do it twice a day.
I love her dearly, and she loves me too but this disease will take her from me soon. We have had 12 wonderful years together and I already miss her so much. All dogs go to heaven, I hope I do so I can see her again.
Dear George,
I am sorry Lucy’s health is declining but glad to hear the daily fluids are helping to prolong her life. It is clear she is dearly loved and I am certain she knows. Here is a link to another article that may be helpful when you have to think about making some tough decisions: Preparing for Your Dog’s Euthanasia: 10 Thoughts for Peace
Hoping you can make the most of the time you have left and fill each day with joy. Praying for your strength and comfort. Bless you both.
How bad were your pups labs? My once 5lb, now probably 4lb, chi is in kidney failure. I want to attempt subq fluids. My vet has said there’s not much that can be done. She is 17, but I want to try something and not just wonder …if I would have would she have felt better for at least a bit.
Hi Margarita,
I am sorry your little pup is not doing well, and it seems as though her kidneys are failing. If you need to try giving fluids just so you can have peace of mind that you tried everything you could, don’t hesitate to bring this up with your vet. Make sure they are aware of your concerns and be honest about your wishes. Even if your vet doesn’t think the fluids will make much difference, as long as you are aware of the possible lack of results, I see no reason why they wouldn’t let you try. I think your vet was just trying to make sure you had realistic expectations and didn’t want to give you false hope. Praying for comfort and peace. Bless you and your sweet girl.
Hi, i have a 14 year old dog and i gave her the subcutaneous fluids last night and the fluids migrated to her left side all the way back to her back leg. Now, today, she is in pain when i barely touch her left side or left leg. Is this normal?
Hi Kirsten,
It is normal for the subcutaneous fluids to move under the influence of gravity. But this should not cause pain and the fluids should be absorbed rather quickly. Please contact your vet about this new pain you are noticing in your senior dog. Hoping all is well and wishing you both the best.
Hi there,
I’ve been giving my dog sub q fluids for a few weeks after a new diagnosis of stage II CKD. While most of the process is easy at this point, I am continuing to struggle with figuring out the true level of fluid in the bag. It doesn’t seem as simple as just looking at the level on the bag; when I hold it taut, it’s a completely different level – sometimes up to a 150 ml difference. Am I doing something wrong? I’ve heard that there’s possibly not enough air in the bag,,,but I’ve also heard I’m not supposed to re-spike the bag due to the possibility of introducing bacteria into the fluid bag. Any guidance is appreciated!
Hi M,
Yes, those fluid bags can be a bit tricky at times! I usually just leave them hanging and try not to squeeze the bag when determining how much fluid is still inside. I completely understand what you are talking about and sometimes I have difficulty making this determination when it seems like the plastic is suctioning in on itself at the top of the bag. It might be worthwhile to take the fluid bag with you to your vet’s office and have them take a look at it. They can let you know what level you are currently at and see if there is anything they can do to make reading the measurements easier.
Approximately 21 years ago I had a border collie that had surgery at Va Tech and was diagnosed with liver cancer and given 10 months to live. A year came and went, then 2 years and into the 3rd year she became very sick again with vomiting and syncope upon standing. I took her back to Tech and they were very surprised to see that she was still alive and admitted that they must have made a mistake with the diagnosis. They did tests and suggested more surgery but I wanted to take her home and think about it for a few days. They agreed to my decision and asked that I bolus in sub-q fluids during that time. I am a retired nurse, so I had no problem with this decision due to my experience with IV’s. They showed me how to do the procedure and I did this for 3-4 days (no problems with the procedure) before deciding to have her put down due to that fact that she continued to worsen and also that she was 14 years old. At this age I couldn’t see putting her back through surgery again.
So if you need to give sub-q fluids to your dog, do so. It is not a difficult process and your vet is there to show you how and assist you if needed.
Hi Lynn,
Thank you for sharing your story and experience with our readers. This is great advice, and I am certain it will be helpful for someone in a similar situation. Best wishes!
my 9 year old dog had subcutaneous fluids given to her by her vet on Monday 8/21/2023. I read that it’s not uncommon for a dog to not feel the need to drink water for a bit after receiving the fluids. she’s 20lbs and received 200 of the fluid and is not drinking water. she’s been given low sodium chicken broth in her water and I gave her a syringe of pedialyte. when should I really worry about her water consumption? please help 🥺
Hi Shawna,
I understand why you are concerned about your dog’s health and well-being. While subcutaneous fluids can help with dehydration, I am not sure you could give enough to keep a dog feeling hydrated for more than several hours. It worries me that your pup has gone so many days without drinking water and eating. I highly recommend you contact your vet and update them on this ongoing situation. Hoping you can get the answers you need soon and praying for a positive outcome for your sweet girl.