Do you have a dog first aid kit? If not, this article is for you! Integrative veterinarian Dr. Julie Buzby explains what to put in your dog first aid kit and why each item is important. Plus, she discusses how to use each component of your canine first aid kit to care for your dog in the event of an emergency.
“Better safe than sorry.” As a veterinarian who has worked in an emergency hospital, I firmly believe that dog parents should live by this motto.
Whether your dog spends his or her days sleeping on the couch or hiking in the mountains, accidents can happen anytime and anywhere. Being cautious and taking the proper precautions can go far. But at the end of the day, an accident is just that—an accident.
It is important that you have the supplies (and knowledge) to handle common doggy emergencies. One of the best ways to do this is by having a dog first aid kit and knowing how to use it.
What to put in a dog first aid kit
As you can imagine, each dog owner’s first aid kit might look slightly different. When you put together dog first aid kits, take into account:
- Your location—the various areas of the country have different dangers and are in different proximity to veterinary care
- Medical conditions your dog has
- Typical activities you like to do with your dog—the first aid kit for a backcountry camping dog is going to be different than one for a suburban couch dweller
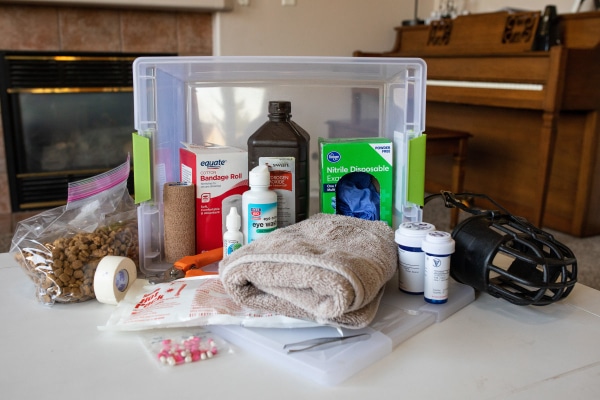
21 items to put in a dog first aid kit
With these factors in mind, I’ve compiled a list of 21 essential items that I think every dog first aid kit should include. Since some of them may already be things you have at home, you can use this first aid kit checklist to determine what you already have and what you may need to purchase:
| DIY FIRST AID KIT CHECKLIST | HAVE | NEED |
|---|---|---|
| Dog nail clippers | ||
| Styptic powder | ||
| Antiseptic wipes or mild soap | ||
| Bandaging material Rolled gauze (i.e. gauze bandage) Square gauze or Telfa™ pads Elastikon® (a sticky, stretchy tape) Vet wrap (i.e. CoFlex®, Coban™, etc.) Adhesive tape (i.e. medical tape or bandaging tape) Antibiotic ointment | ||
| Blunt-tipped scissors | ||
| Latex or nitrile gloves | ||
| Large towel | ||
| Slip leash | ||
| Dog muzzle | ||
| Treats | ||
| Ice pack | ||
| Benadryl | ||
| Tick remover or tweezers | ||
| Epsom salts | ||
| Eye wash (sterile saline) | ||
| Hydrogen peroxide | ||
| Dog thermometer | ||
| Probiotics | ||
| 3-5 day supply of dog food | ||
| 3-5 day supply of dog’s meds | ||
| List of emergency phone numbers | ||
| Information about your dog’s meds and health history | ||
| Collapsible bowl | ||
| First aid container (colorful and waterproof) |
Now let’s take a look at why each item belongs in a first aid kit for a dog and how to use them:
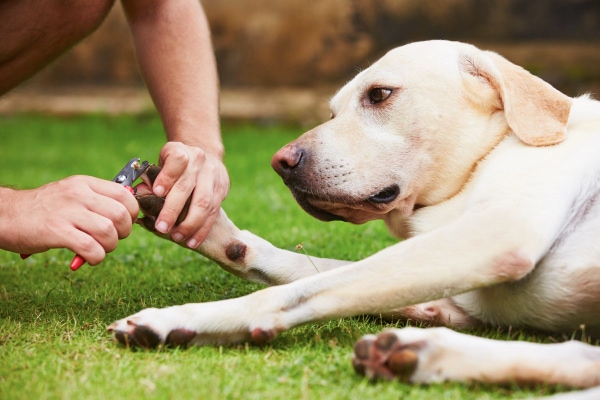
1. Dog nail clippers and styptic powder
Should your dog rip a nail off or you cut a nail too short, Kwik-Stop (or another styptic powder or pencil) works great to stop a dog’s nail from bleeding. And if you need to trim back your dog’s split nail (or cut your dog’s nails at other times) having dog nail clippers in the first aid kit will keep them close at hand.
2. Antiseptic wipes or mild soap
Carrying antiseptic wipes (e.g. chlorhexidine or iodine wipes) allows you to clean mild wounds even if you don’t have access to water. But don’t use them near your dog’s eyes, and never use alcohol wipes on wounds.
Alternatively, having a small container of soap gives you the option of washing wounds with soap and water. Plus, bathing him or her with mild dishwashing soap is also a great way to remove toxic substances from your dog’s skin.
3. Bandaging material
I recommend having the following bandaging materials in your dog’s first aid kit
- Rolled gauze (i.e. gauze bandage)
- Square gauze or Telfa™ pads
- Elastikon® (a sticky, stretchy tape)
- Vet wrap (i.e. CoFlex®, Coban™, etc.)
- Adhesive tape (i.e. medical tape or bandaging tape)
- Antibiotic ointment
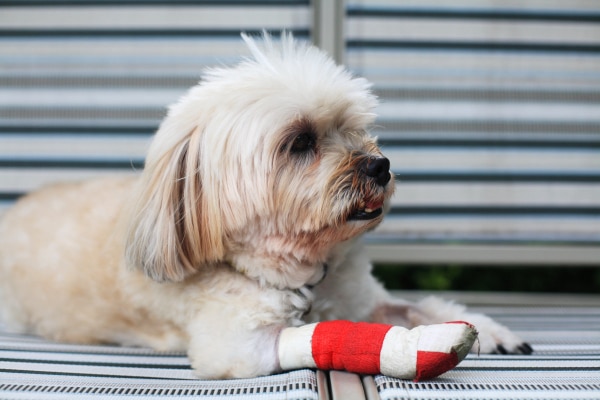
Dog wound bandaging tutorial
To prevent infection, flushing wounds with sterile saline (e.g. eye wash), washing the area with mild soap and water, or cleaning the wound with an antiseptic wipe before applying a bandage is ideal. If this isn’t possible, at least try to gently remove any debris.
After cleaning the wound, pat it dry (if needed) and apply antibiotic ointment. Next, cover the wound with a Telfa pad, and wrap over the pad and around the limb with roll gauze. Then use a layer of vet wrap to cover the roll gauze and secure with medical tape or Elastikon
(For more detailed instructions, check out my article: How to Wrap a Dog’s Paw.)
CAUTION: A too tight bandage can be dangerous for your dog. Ensure you can fit one or two fingers into the top of the bandage. And watch the toes for swelling, coolness, or discoloration, which are all signs the bandage is too tight.
4. Blunt-tipped scissors
A pair of blunt-tipped scissors come in handy for cutting bandaging material, removing soiled or too-tight bandages, or trimming hair around a wound.
5. Latex or nitrile gloves
Wearing a pair of disposable gloves (e.g. latex or nitrile gloves) keeps your hands clean while treating your dog’s wound. And these “safety gloves” also protect your dog from bacteria or other substances that could be on your hands.
6. Clean bath towel
A clean bath towel can serve many purposes, including:
- Substituting as a bandage or wrap if you are missing other supplies
- Cleaning and drying a wound before bandaging
- Applying pressure to a bleeding injury
- Keeping your dog warm if his or her body temperature is low
- Acting as a sling for a large dog who injured a leg and needs help walking
7. Slip leash
A slip leash (i.e. single piece of nylon that acts as a leash and collar in one and fits any size dog) can be used:
- As a replacement if your dog loses or breaks his or her collar and leash
- To leash your dog quickly in an emergency situation
- As a makeshift muzzle (more on that next)
8. Dog muzzle
Pain in dogs can cause even the best, nicest dogs in the world to bite or snap. Therefore, it is best to include a muzzle—one that you know fits your dog appropriately—in your dog emergency kit, just in case.
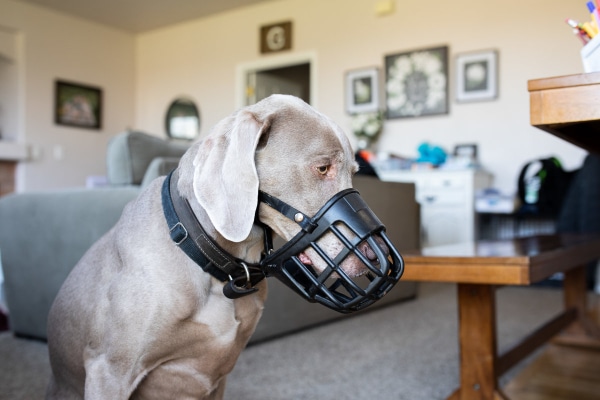
There are several dog muzzle options:
- Basket muzzle (best choice)—This type of muzzle fully encloses your dog’s mouth so there is no way for him or her to bite you. But it still allows your dog to pant and bark.
- Nylon muzzle (second choice)— This type of muzzle slips over a dog’s nose and mouth to reduce how wide the mouth can be opened. While a dog can still bite with this type of muzzle on, it is more difficult.
- Makeshift muzzle (works in a pinch)—This is a DIY muzzle. Start by tying the leash or a strip of material around your dog’s muzzle so that the tied portion is under his or her chin. Then bring the free ends of the fabric or leash around to the back of your dog’s head and tie them behind his or her ears.
Which ever option you pick, I highly recommend trying the muzzle on your dog ahead of time. That way you know it fits and you have practiced using it before you are in an emergency situation.
Caution: If your dog is having trouble breathing or is a brachycephalic (i.e. short-nosed) dog, a nylon muzzle or makeshift muzzle can make breathing more difficult by forcing your dog to keep his or her mouth shut. A basket muzzle is much safer for both of these situations.
9. Treats
Having a few dog treats on hand can help distract a dog while you are cleaning a minor cut (assuming you don’t feel your dog needs a muzzle). Plus, if you need to unexpectedly give your dog medication such a Benadryl, having a treat that doubles as a pill-hiding device (e.g. Pill Pockets™) can be helpful.
10. Ice pack
Just like in humans, ice packs are great at relieving pain and swelling in dogs. Plus, if your dog gets an insect bite or sting (or comes in contact with an allergen), an ice pack can be soothing.
If your first aid kit is at home, you can keep the ice pack in the freezer. But if you are traveling or taking your dog emergency kit with you, an ice pack that can be activated when squished or bent would be more beneficial. (If you are using this type of ice pack, it is important to inspect it every few months. They can become accidentally activated, which would render them useless when you need them.)
11. Benadryl® (diphenhydramine)
If your dog is having an allergic reaction to a bug bite or something in the environment, Benadryl® for dogs can come in handy. (Additionally, Benadryl is sometimes useful for snake bites on dogs. But this is something you should ask your vet about ahead of time.)
When buying Benadryl, look for the 25 mg diphenhydramine tablets that don’t contain any other drugs (e.g. acetaminophen, pseudoephedrine, etc.). And consult your vet before using liquid Benadryl because it may contain the artificial sweetener, xylitol, which is toxic for dogs.
I recommend talking with your vet about how much Benadryl you should give your dog. Then write the dose on the bottle with permanent marker. That way you don’t have to try to remember the dose in an emergency situation.
CAUTION: If your dog is having a severe anaphylactic reaction or got bit by a snake, make an emergency vet visit ASAP. Both can be life-threatening for dogs.
12. Tick remover or tweezers
Should your dog pick up a tick, tweezers, or better yet, a special tool called a “tick remover” can be a great way to safely remove it. Tick bites can transmit tickborne diseases in dogs. So it is important to get ticks off your dog as soon as you notice them.
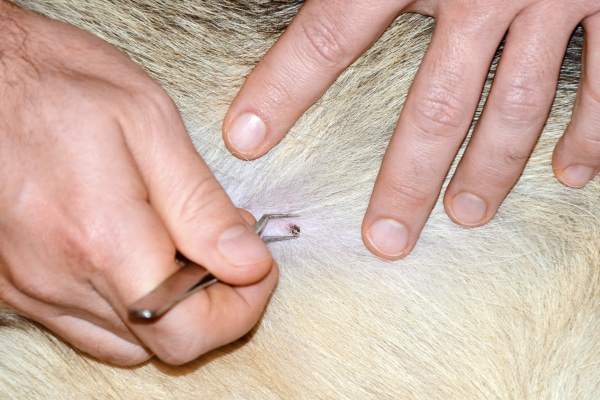
When using tweezers to remove a tick, the key is to grasp the tick as close to the skin as possible without pinching your dog’s skin. Then gently pull the tick off.
Tick removal tools follow the same concept, but they vary a bit from one to the other. So I recommend familiarizing yourself with your particular tool before you need to use it.
As a bonus use, tweezers are also great for removing a foreign object that may have gotten stuck in your dog’s skin.
13. Epsom salts
In certain areas of the country, foxtails in dogs (and other grass awns) can become embedded in your dog’s skin or migrate through the body. Sometimes using an Epsom salt soak can help draw the foxtail out if it has just started to burrow into the skin. But you need to be careful not to let your dog lick or drink the Epsom salt soak water.
14. Eye wash
If you think your dog has a foreign object or irritating substance in his or her eye, you can try using a saline eye flush to rinse the eye. Take care not to touch the tip of the eye wash to your dog’s eye. And use a generous amount of eye wash to flush out the eye (more is better).

15. Hydrogen peroxide
At one point, hydrogen peroxide was the “go to” method of making dogs vomit. However, now we know that it carries some risks (e.g. GI irritation, aspiration pneumonia, etc.). Plus, vets now have safer and more effective ways to induce vomiting.
Therefore, before reaching for the peroxide, it is best to contact your veterinarian, ASPCA Animal Poison Control Center, or Pet Poison Helpline if you think your dog ingested a toxin. (The ASPCA and Pet Poison Helpline do charge a fee to talk to the veterinary toxicology team. But, in my opinion, the peace of mind that comes from calling them is worth every cent.)
Most of the time, the vet or toxicologist will recommend going to the vet clinic for treatment. However, if you cannot make it to a veterinarian in a timely manner, sometimes the risks of the toxin staying in your dog’s body may outweigh the risks of giving your dog peroxide. For this reason, I still recommend keeping hydrogen peroxide in your dog’s first aid kit.
What about using peroxide to clean wounds?
As a side note, it is no longer recommended to use peroxide to clean wounds. Peroxide can be irritating to the tissue and slow down wound healing,
16. Dog thermometer
Having a digital thermometer and knowing how to take your dog’s temperature gives you valuable information about your dog’s health status.

To interpret your dog’s temperature, use the following guidelines
- 100o-102.5oF—Normal
- Above 104o F—Contact your vet as this could be a sign of sickness or the dog overheating
- 107o-109oF—Rush to the emergency room as your dog may have life-threatening heat stroke in dogs
- Below 100o—Contact your vet if your dog is acting sick
Disclaimer: Dogs can have a normal temperature and be sick or an abnormal temperature and be fine. Thus, you should not base the decision of whether or not to go to the vet on temperature alone.
17. Probiotics
If your dog is having diarrhea but acting fine , giving your dog probiotics and a bland diet for dogs can be a great way to help your dog recover faster. However, if you have any questions or your dog’s GI problems seem to be progressing, please contact your veterinarian immediately. And if your dog is vomiting blood, having bloody diarrhea, or seems very painful, call your veterinarian right away.
18. Your dog’s prescriptions and food
I recommend that pet parents stock their first aid kits with at least three to five days’ worth of their dog’s food, medications, and supplements. Doing so is especially important if your dog is on a special or prescription diet or needs daily medication.
That way you will have the things you need to care for your dog for a few days should you need to evacuate with your dog.
19. List of emergency phone numbers and summary of your dog’s medical history
It is a great idea to type out phone numbers pet owners commonly need and put them on a laminated card in your first aid kit. You many want to include:
- Your regular vet’s number
- The number of the closest emergency vet
- The number for the ASPCA Animal Poison Control Center or Pet Poison Helpline
Additionally, if your dog is on long-term medications or has a medical condition, it is important to note that on the card. And if you are traveling, you may want to add a copy of your dog’s medical records to your dog’s first aid kit.
20. Collapsible bowl
It is important to be able to give your dog access to fresh, clean water. Since dogs can’t drink out of a water bottle as easily as us, it can be helpful to pack a collapsible bowl in your dog’s first aid kit. That way, should you be worried that your dog might be getting overheated, dehydrated, or just thirsty, you have an easy way to offer your dog some water.
21. Colorful waterproof container to hold your supplies
Finally, you will need a suitable container for your first aid kit. When selecting a container, keep these important attributes in mind:
- Brightly colored—Having all your first aid supplies in a bright orange or red box makes it much easier to locate your dog’s first aid kit in an emergency. And it makes it simple for other family members or the pet sitter to spot too.
- Waterproof—A waterproof container will help protect your supplies from being damaged by moisture.
- Portable and packable—The container should be easy to carry or travel with. If you are hiking, camping, or traveling with your dog, I recommend bringing the first aid kit with you. When you are away from home or in an unfamiliar area, you don’t want to waste precious time looking for a store to find the supplies you need.
- Large capacity—A first aid kit for a dog should be large enough to store all your supplies and easy to use. In an emergency, you want to know exactly where everything is located so you can access it quickly.
What doesn’t belong in a first aid kit for a dog?
When researching DIY dog first aid kits, you may have come across a few items that I generally don’t think need to go in your first aid kit. They include:
- Human pain medications—While aspirin is technically safe for dogs, it is inferior to dog-specific non-steroidal anti-inflammatories (NSAIDs). Plus, giving your dog aspirin increases the risks of side effects when switching to a dog-specific NSAID and limits the pain medications your vet can use. Additionally, other human pain medications, like Advil (ibuprofen), are toxic for dogs.
- Milk of magnesia (magnesium hydroxide)—You may have read about giving milk of magnesia to dogs who have ingested toxins. But most of the time there are safer, and more effective, options. And in some cases, milk of magnesia can be harmful to your dog. Thus, I don’t think it deserves a spot in a first aid kit for a dog.
- Activated charcoal—While activated charcoal is great for treating some toxicity cases, it is contraindicated for certain toxins. And it can also be problematic in dogs who are dehydrated, have GI ulcers, or have slow GI motility. So the decision to use activated charcoal is best left to the professionals.
Like all things, there can be exceptions. If you are in a very remote area, your vet might suggest having some of those items. Typically, he or she will give you specific guidelines on how and when to use them.
What if I want to buy a first aid kit instead of making the DIY version?
I understand that some dog parents are juggling a lot of demands on their time, so they would rather buy a pre-made first aid kit. This can be a good option too, but be aware that you might still need to add a few things. And especially if you purchase a kit, rather than making one, it is important to know what is actually in your kit and how to use each item.
Finding the best dog first aid kit
When shopping for the best dog first aid kit, ask yourself the following questions:
- What am I using this kit for and how many scenarios do I want to be prepared for? Some kits are more suited for hiking or camping. And others might be designed to stay in your house or car. And some just contain the basics while others are outfitted for more intensive first aid.
- How likely is it I would feel comfortable using the components of the kit? You can buy dog first aid kits that contain wound staplers and hemostatic forceps. But when push came to shove, would you be ready to staple a wound or clamp a bleeding vessel? If the answer is no, or you generally have quick access to emergency veterinary care, you probably don’t need to spend the money on a kit containing those tools.
- Is the container big enough to hold the extras I might want to add? How much more will I need to put in the kit to customize it for my dog’s needs? At the very least, you will probably need to add in a muzzle that fits your dog, some treats and your dog’s food and medicine. But if you purchase a basic kit, you are probably going to be adding a lot more.
- What am I paying for, and is it worth it to me? There is a lot of convenience associated with not having to buy each item on the DIY first aid kit list. But, for a budget-conscious dog parent, the DIY method might still come out as a winner. Plus, keep in mind that no matter the kit type, you are still going to need to switch out components that are past their expiration date (e.g. peroxide, Benadryl, saline, etc.).
Get started with making or selecting a dog first aid kit (or reviewing the kit you have)
Now that you know what to pack (or look for) in a dog first aid kit, it is time to take action. Why not set aside some time in the near future to purchase and organize all the necessary supplies to make a DIY dog first aid kit? Or use that time to do some research to find the commercially-available dog first aid kit that best suits your needs?
Alternatively, if you already have a dog first aid kit, now is a great time to take a few minutes to ensure it contains everything you need. Plus, taking inventory of your kit gives you the opportunity to double-check that all the items are in good working order and not expired.
As my mom always said, “Better safe than sorry!”
What’s in your dog first aid kit?
Please share some of your “must-have” items below!

My 12-year-old mini-dachshund was just diagnosed with stage 2 kidney disease and was prescribed Hill’s KD Diet. I was supplementing some portion of it with roasted skinless, boneless chicken and pumpkin puree. I cannot find, anywhere on the internet, with what other foods I might supplement the expensive Hill’s KD. I stopped the chicken as I was told by the Vet that protein is to be avoided. Are green beans, broccoli and carrots okay?
Thank You
Hi Fiona,
My initial reaction is that the green beans and broccoli would be ok as long as there is no salt added. Carrots are ok for dogs but are higher in sugar. If you want to be certain the addition of these foods is ok for your dog’s specific situation, I highly recommend you schedule a consultation with a veterinary nutritionist. They can look at the details of your dog’s medial history and help you formulate a diet that is ideal and complete. Also, here is a link to another article with great ideas of healthy options for dogs: 14 Vegetables Dogs Can Eat (and May Just Love)
Wishing you both the best and give your little pup a hug for me!
We have an 8.5 year old male Cavilier King Charles. As most are, he is very special and follows me everywhere. He also has issues with his hips and back knees. Has had surgery on both. We are thinking of getting another King Charles but wonder how he will accept another dog. I’m afraid he would be heartbroken . Also a puppy might be too much pho for him. What is your opinion?
Hi Dottie,
I understand your concern for your senior guy and think it is good you are considering this from every angle. Unfortunately, each dog is different and their personalities vary. It would be difficult for me to tell you how to expect your pup to react without knowing your dog myself. In general, most dogs do well with the introduction of another dog/puppy into the household. There will surely be an adjustment period and there are things that can be done to make this transition easier on everyone. Here is a link to another article that talks about this specific topic: How to Introduce Your New Puppy to Your Older Dog
I hope that sheds some light on this process. Wishing you the best of luck!